Author Topic: My U-69  (Read 45131 times)

0 Members and 4 Guests are viewing this topic.

LE BOSCO

  • Guest
Re: My U-69
« Reply #45 on: 24 Aug , 2010, 13:03 »
HI  T

Your U-69 are really to be "grandiose"with this PE!
best regards
Nicolas

TRM

  • Guest
Re: My U-69
« Reply #46 on: 25 Aug , 2010, 13:00 »
Thanks Nicolas.  Dougie and Wink (from this site) did an awesome job on the PE.  I think it will make a big difference.  Still working on the torpedo vent section tonight, I hope to have another update by the weekend.

Cheers!

Offline Sniperonzolo

  • Lieutenant (jg)
  • *
  • Posts: 73
Re: My U-69
« Reply #47 on: 25 Aug , 2010, 18:42 »
muahahahah

THEY ARE REALLY GOOD PE!
I'VE USED THEM ON MINE AND FIT IT PERFECTLY!

yay!!!

Offline Rokket

  • Administrator
  • *
  • Posts: 2,362
  • Gender: Male
  • Submarine Enthusiast
    • AMP - Accurate Model Parts
Re: My U-69
« Reply #48 on: 29 Aug , 2010, 08:16 »
glad you got your PE and thanks for the nice words. Good luck!
AMP - Accurate Model Parts - http://amp.rokket.biz

TRM

  • Guest
Re: My U-69
« Reply #49 on: 29 Aug , 2010, 15:47 »
Hello All,

Update....since getting the AMP PE I have been sliding in some time to move forward on the build.  Worked on the Bow round vents, Saddle trios, bow slots and finally the torp doors....these seems to be the most problematic to date.  It certainly is not the  PE itself.  It has to do with preparation of the area intended.  Carving out the space for the vent section to sit for support is laborious.  Time should definitely be set aside to slowly mill down the area and then chisel and sand remaining material to insure a tight fit.  The seem to fit nicely and smooth BEFORE I added the CA???? Some of the edges after gluing were raised and would most certainly show.  I have also learned that it is good to show mistakes along the way also.  This will hopefully make someone more aware to the issues before the pop out at them and they throw out a perfectly good model.


Impressive little template! :o
Below: the layout process for seating the torp vent/doors.  Color coded so I would not forget what I was taking out.

Initial grinding for a nice tight fit....or so I thought :D :D :D

Placement...

Mudding....term used by plasterers when smoothing out the walls on a job (fixing screw-ups)

Sanding, sanding, oh yeah, more sanding and then....

Fregattenkapit
« Last Edit: 29 Aug , 2010, 16:22 by TRM »

LE BOSCO

  • Guest
Re: My U-69
« Reply #50 on: 30 Aug , 2010, 10:41 »
Hi TRM

great job  :o :o!You push the very far detail!!!!the Fregattenkapit

TRM

  • Guest
Re: My U-69
« Reply #51 on: 30 Aug , 2010, 11:29 »
Thanks Nicolas.  I think my wife was trying to tell me I am #1....at least I would like to believe this to be true.  LOL! ;)

Offline GlennCauley

  • Admiral
  • *
  • Posts: 646
    • Models by Glenn Cauley
Re: My U-69
« Reply #52 on: 30 Aug , 2010, 12:19 »
Looking good!    Been the same route as you, mate, and felt bad cutting big chunks of plastic out of the hull!  I got through it, so will you.  hehehe

With all the cutting, grinding, puttying, and sanding... this is another perfect model to benefit from the Archer Fine Transfers U-boat Super Detail (Rivet & Weld) set!!!   ;D     I used it on my own U-673 and it made rivet replacement SO much easier it boggled my mind.
(Okay, yes I am biased because I'm also the guy who design the set.... but it really IS worth it.)

Check it out:
http://www.archertransfers.com/AR88023.html
http://www.archertransfers.com/WEB%20pictures/AR88023%20ins.pdf
http://models.rokket.biz/index.php?topic=165.0
http://www.travel-net.com/~gcauley/U673/files/Review_AR88023.pdf
Glenn Cauley
President, IPMS Ottawa
gc-scalemodels.ca

TRM

  • Guest
Re: My U-69
« Reply #53 on: 30 Aug , 2010, 12:37 »
Thanks Glenn.  And while I have you....surpurb build on the U-673!  I am going to definately put this on my wish list for my birthday next month. Some of the rivets I replaced looked not half bad, but some were needing a little work (a lot).  I have seen some of the other builds that have used them and it make for a nice clean, crisp hull.  Great work!

As for the cutting, grinding, sanding and such.  I love that part....it's when I set something at the wrong depth or place and it results in "un-neccessary" cutting, grinding and sanding.  This would be a learning curve.
Thanks Again,

T

LE BOSCO

  • Guest
Re: My U-69
« Reply #54 on: 30 Aug , 2010, 13:11 »
.  I think my wife was trying to tell me I am #1....at least I would like to believe this to be true.  LOL! ;)

I am sure that you is right! :D :D :D
Nicolas

TRM

  • Guest
Re: My U-69
« Reply #55 on: 05 Sep , 2010, 14:41 »
Hello,

Today I decided to keep busy on the 69 with the pressure hull.  I have been patiently waiting for the Modelbrass upgrade....to my dismay, nothing!  Not a shipping notice, not an e-mail confirmation, :'(not even a post card!  Just the lonely Pay Pal statement mentioning "transaction complete".

Bill!!!!!!!!!  You were spot on.  Thank you.

Anyway,  after Glenn had posted the bit about Archer, I was lurking around his 673 build site.

Modeling U-673 "Flak-trap" by Glenn Cauley

 I found myself prior, attempting different methods of getting the non-hollow effect and was starting then scrapping, over and over again.  The I saw Glenn's pressure hull layout.  THANK YOU!  After checking the supplies, I was only lacking the .080 sheet stock for the main ribs.  Found some .25" Poplar instead.  Off to work I went....


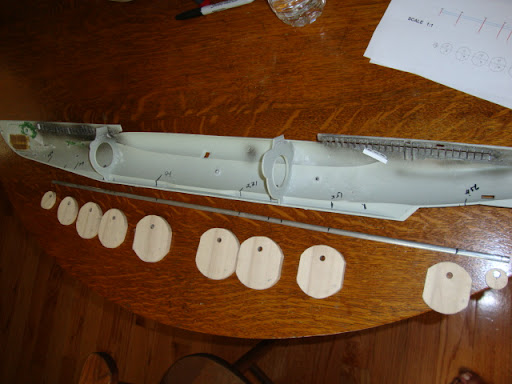
Scaled up the print, drilling, band saw and sanding


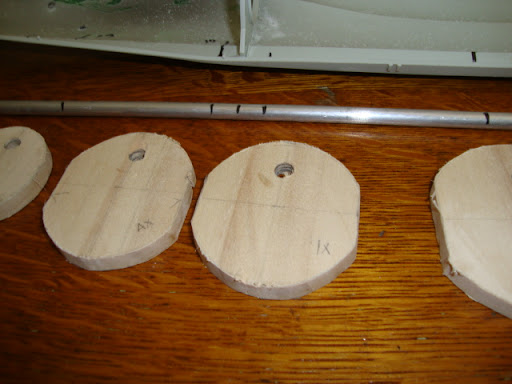
Carefull labeling as per Mr. Cauley's exquisite layout ;D

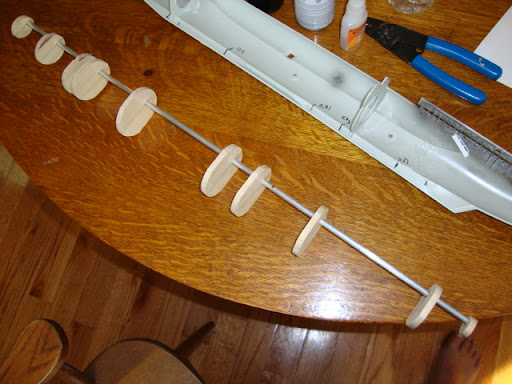
Using a .25" Aluminum rod I had for the spine...
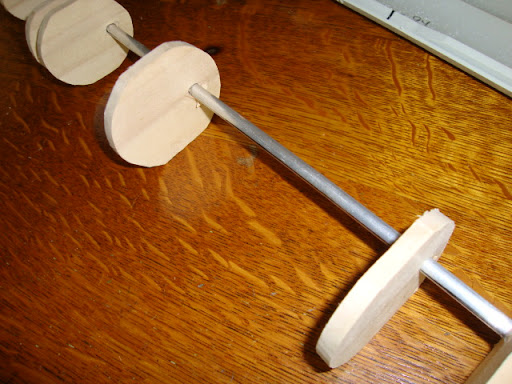
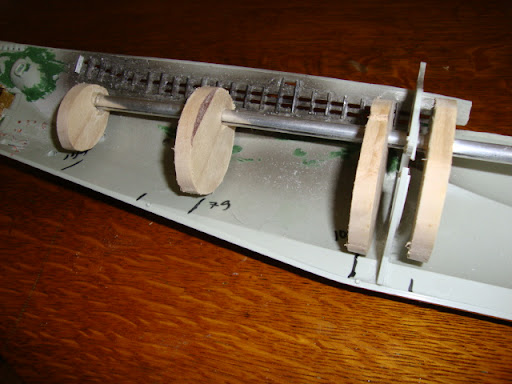


Dry-fitting....


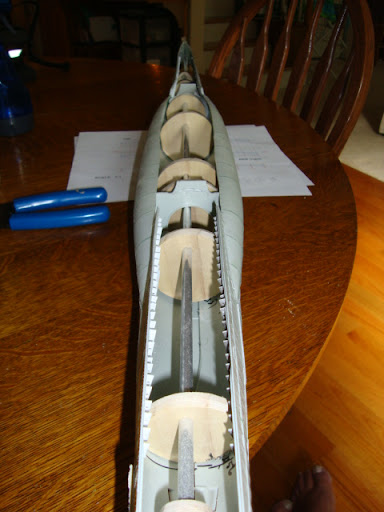
Some fairing took place, and a bit more I presume.  Not I need to remove the kit supplied ribs, so to make room for the continuous pressure hull skin.  Now while I am WAITING FOR MY ORDER FROM MODELBRASS, for my BOTTOM VENTS, I will finish the skin and work on the saddle tanks and torpedo door framing.

Cheers!
« Last Edit: 06 Sep , 2010, 06:40 by TRM »

LE BOSCO

  • Guest
Re: My U-69
« Reply #56 on: 05 Sep , 2010, 15:01 »
HI T

 :o :o :o Great skeleton of T-rex :D :D ;)
Magnificent work my friend!
bravo !
Nicolas

TRM

  • Guest
Re: My U-69
« Reply #57 on: 05 Sep , 2010, 15:13 »
Thank you Nicolas.  Live and learn from others....mostly learn from others, occasionally I come up with something on my own.  This one is all on Glenn. ::)

Offline billp51d

  • Lt Cdr
  • *
  • Posts: 194
  • Gender: Male
Re: My U-69
« Reply #58 on: 06 Sep , 2010, 10:29 »
    TRM... Nice idea using the plywood for the different bulkhead sizes ! It seemed to me that it took forever for the .080 stryrene to come in the mail. Glenn Cauley did do many of us a favor with all the research that he did on bulkhead diameters!! I did use the Revel bulkheads in addition though as i felt it " Keyed " the complete assembly for installation. I just trimed of the top of the kit parts to the proper profile.
           If you are considering "Saddle Tank" extentions, this could be helpful. Glenn used a 1.25 Dia. piece of wood round stock. Well, I searched all over the house for 1.25 stock. "Shovel handles, etc.", but to no avail! What I did find though was a section of tubeing from an old cannister vacuum cleaner. Wrapping the tube with wax paper, to prevent sticking, and tightly tapeing the styrene blank with tape on the tube did the trick. Apply heat from a heat gun. Let cool. This worked fine for me.
           I've been following your build from the start. Very impressive.
                                                                              Bill in Delaware
 

TRM

  • Guest
Re: My U-69
« Reply #59 on: 06 Sep , 2010, 16:41 »
Thanks Bill.  The wood hit me after raking my brain in "plastic mode" about what I could use without buying.  Used the same Poplar to fair out a Sultana 1/64th plank on bulkhead wooden ship.  As for the extensions, I found a 0.75" piece of dowel last night.  Cut the two pieces and cooked them up.  I worked perfect.  There was a slight twist that , because of the thinness of the stock, I can correct.  Curious though.  The template is perfect, but when I was finished it appears to be about an inch too short.  I will add the pieces after.  I keep walking buy the model, wanting to pop the pressure hull in and go!!!!  I really need to wait for the damn Modelbrass PE so I can properly cut out the bottom vents.  I still have interior framing to do.  The skin of the pressure hull, I may end up using something a little different than the 0.010 stock.  I tried a piece and it works but I can see some fitting issues right off.  I have a method I am working on this week.  I will post the pics when I get it right.


Cheers!
« Last Edit: 07 Sep , 2010, 04:03 by TRM »