Author Topic: New Member SS223 build  (Read 18560 times)

0 Members and 1 Guest are viewing this topic.

Grossekatz

  • Guest
New Member SS223 build
« on: 27 Jun , 2010, 15:58 »
Hello All, I have been working on my revell Gato for a few months. Now that I have made some progress I would like to share. http://img257.imageshack.us/g/dsc01420h.jpg/ 
I need a few things before I put the main hull together. I plan on cutting the free flood holes in the hull and adding a resin sonor suite, I found the sonor parts but cant seem to find any references on the layout of the holes. Any help is appreciated. I am also curious about the paint sceme, in the Bonefishes patrol report on navsource it is stated that the ship was repainted just before her 3rd patrol around dec 43. Grey on the vertical and black on the horizontal. Would this sceme have been coutershaded or is it just as simple as it is  described in the report.
 Again any help is great.
  I look forward to sharing more as the project progresses.


TRM

  • Guest
Re: New Member SS223 build
« Reply #1 on: 28 Jun , 2010, 18:17 »
Grossekatz,

Great job!  Your coming along nicely. Looking forward to seeing your prgress.

Thanks for sharing!

Cheers!

Offline aptivaboy

  • Lieutenant
  • *
  • Posts: 81
Re: New Member SS223 build
« Reply #2 on: 01 Jul , 2010, 13:04 »
This might help: http://navsource.org/archives/08/pdf/0849201.pdf

Lots of information in there about painting, countershading, etc. Whether it applied to Bonefish at that time, I cannot say. You may wish to research boats in the same production bloc and deployed to the same theater, like Cod, to fill in any holes. What was done to Bonefish may have been done to the others - maybe.

Robert

Offline Rokket

  • Administrator
  • *
  • Posts: 2,362
  • Gender: Male
  • Submarine Enthusiast
    • AMP - Accurate Model Parts
Re: New Member SS223 build
« Reply #3 on: 03 Jul , 2010, 03:35 »
Welcome aboard! Coming along very nice, nice detail bits!

Bonefish Torpedo shutters - not confirmed, but she PROBABLY had the kit "spoon" style, so you are safe, and looking good with your linkage slot mods! AMP make a set that we think is better than the kit:
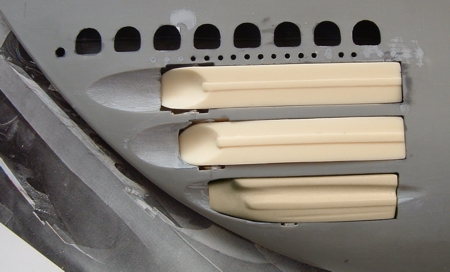
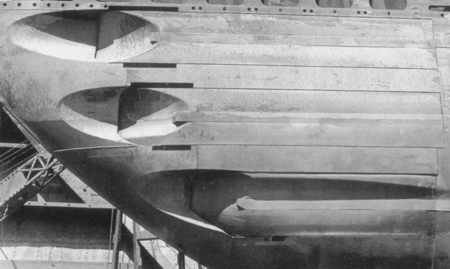


Paint: Robert has given you an excellent link. The early boats were launched in Measure 9 - all black (mostly flat, some gloss buts), and later repainted, and new boats launched with Measure 32: hull black, top and fairwater gray, some wavy bits.

ED: NOTE: I misread your post, so the following will sound pretty stupid, but I think it still fits:

Measure 32 was introduced in March 1944. Bonefish was commissioned May 1943, so she probably started with Measure 9. The launch pic at navsource and wikipedia show an even, dark, tone, def black! But she was also probably repainted later. If you are depicting her past march 44, you're safe with M32. Her 4th patrol was April-May 44, doubtful that she was repainted at this time (not enough time between the order and refit time and out for patrol). The earliest easily possible repaint would have been on return, before her 5th patrol (June to August). Speculation, but trying to fit in with known info. This pic showing her in Measure 32 black/gray is at navsource.org, and says "...Fremantle, Austraila, circa 1943 - 45" but we know it's AFTER 43 because of the M32 color.


Even tho Bonefish was repainted in  dec 43, I think she would have been repainted in BLACK, because the boats were constantly painted, it was "nothing" to slap on some more paint. Cdr O'Kane of Tang noted how FAST his newly painted boat looked faded and chipped (a patrol). so even after rereading your post, i stand by the logic of the above.  I'll try to dig up a visual for M32...

great wtuff, keep it up! Oh, sonar, wil see what I can find, I' sure some folks have done the sound heads and have some info...


AMP - Accurate Model Parts - http://amp.rokket.biz

Offline Rokket

  • Administrator
  • *
  • Posts: 2,362
  • Gender: Male
  • Submarine Enthusiast
    • AMP - Accurate Model Parts
Re: New Member SS223 build
« Reply #4 on: 03 Jul , 2010, 03:45 »
I THINK the twin sound heads were between FRame 34-35, at the AFT end of the FWD torpedo rm. The plan I have is dark and fuzzy, but indicates two stowage cylinders there, and the retractable pitot log. A report on SS-271 RAY says she once tore her sound heads off and damaged the Fwd Torp Rm, so it would concur, or at least not conflict... Mike will probably know!
AMP - Accurate Model Parts - http://amp.rokket.biz

Mike K

  • Guest
Re: New Member SS223 build
« Reply #5 on: 04 Jul , 2010, 14:31 »
First, check out Iron Bottom Sound. They have a set of sound heads, housing tubes and instructions, that'll do the job. But, if your a scratch-build nut, drop me an email ( mkeating(at)cox(dot)net ). I've got BuShips drawings for the Portsmouth installation. Which is the Iron Bottom Sound version.

Mike K.

Grossekatz

  • Guest
Re: New Member SS223 build
« Reply #6 on: 10 Jul , 2010, 01:33 »
thanks for the help,
 I ordered a sonar suite as well as the eduard photoetch detail set and side plates and replacement rivets are on there way from archer. I sent an email to nautalus about their  aa guns and flood hole templates. that should be the last of the aftermarket bits I need. I have been working on the decks and fairwater the last few days, I reshaped the front of the fairwater to better match the pics as well as removed the extra lockers that I do not think she had. I will post pics of the progress soon.

Offline Rokket

  • Administrator
  • *
  • Posts: 2,362
  • Gender: Male
  • Submarine Enthusiast
    • AMP - Accurate Model Parts
Re: New Member SS223 build
« Reply #7 on: 12 Jul , 2010, 08:36 »
looking fwd to pix!
AMP - Accurate Model Parts - http://amp.rokket.biz

chipper

  • Guest
Re: New Member SS223 build
« Reply #8 on: 23 Jul , 2010, 07:54 »
A quick question for Mike Keatings regarding Sound Head installations.  I wasn't aware there was a difference between the Electric Boat yards and Portsmouth.  Was there that much difference?   

Mike K

  • Guest
Re: New Member SS223 build
« Reply #9 on: 23 Jul , 2010, 20:19 »
I don't believe so. They were similar enough that it should make little difference, to a modeler. But all the diesel boats I served on, were either Portsmouth built or built to Portsmouth designs. And all of my drawings are from Portsmouth. So, I can't say that with absolute surety.

Mike K.

Grossekatz

  • Guest
Re: New Member SS223 build
« Reply #10 on: 24 Jul , 2010, 21:45 »
I have been able to log a ton of hours on the project in the last few weeks with parts on the way for the hullmI decided to focus on the fairwater. it is nearly complete now, it just needs final weathering. here are a few pics of the progress.


h


« Last Edit: 24 Jul , 2010, 21:49 by Grossekatz »

Grossekatz

  • Guest
Re: New Member SS223 build
« Reply #11 on: 24 Jul , 2010, 21:48 »
more pics


TRM

  • Guest
Re: New Member SS223 build
« Reply #12 on: 25 Jul , 2010, 07:22 »
Excellent Grossekatz!  Nice attention to detail.

Offline Rokket

  • Administrator
  • *
  • Posts: 2,362
  • Gender: Male
  • Submarine Enthusiast
    • AMP - Accurate Model Parts
Re: New Member SS223 build
« Reply #13 on: 26 Jul , 2010, 02:54 »
Love the weathering, and that sweet TBT! Tell us more about both!
AMP - Accurate Model Parts - http://amp.rokket.biz

Mike K

  • Guest
Re: New Member SS223 build
« Reply #14 on: 26 Jul , 2010, 17:55 »
WHOA!!! I just realized that I made a serious screw-up. There ARE several major, exterior difference between EB/ Manitowoc and Portsmouth/Mare Island boats.
First, the anchor is on the starboard side, on PNSY boats and Port on The EB boats. And the companion way, on the forward deck, is offset in the same way. But beware. On some boats, the companion way, was centerline. I was on one. But it had been Guppied, and I don't know if that was the reason. Check pictures of the boat, you're building, and see what they show.
As a side note; Silversides was built with port and starboard anchors. But the port anchors were removed, and the wells plated over, before completion.

Mike K.

Grossekatz

  • Guest
Re: New Member SS223 build
« Reply #15 on: 26 Jul , 2010, 22:45 »
the tbt's started life as the kit part I chopped off the ugly block around it then built the stands out of some spare photo etch bits I had laying around. I also added the cables and bases to them. The lenses are from the eduard set  the sunshades are small bits of stretched sprue and the handles are thin brass wire bent around what's left of the kit part. The rear tbt got its frame stand and wiring as well as some spare parts to represent the comms gear that seems to be in all the pics.  The paint work it all started off as a dark grey primer base, it also ends up being the color for the decking and roof. Then I masked and sprayed the whole thing in tamiya insignia white, its a light coat letting the dark primer through in places to add depth. The whole thing then got a dark blue/grey oil wash. once that set up I added a filter of yellow ocre, white, black  and a burnt sienna. once that was blended I gave the rivit and other small details a pin wash of black. Next I faded it to the final color with a light grey and whit paint scrub. this same scrub is also used on the decking to give that sun faded look. Then I added stains and scuffs  to the deck with a burnt umber oils. The chipping is done with a fine brush and the model masters metalizer gunmetal. This stuff is supposed to be airbrushed on but I brush it on and I relly like the affect. I focus on areas of heavy traffic first and edges where the paint would be worn easily. Then I add the small chips the the large areas. After that I pick out the spots for the large chips. I try to use as few of  the big ones as posible, a little goes a long way. The rust tones are burnt and raw sienna placed with a fine brush and then blended into streaks and stains with a large flat brush I try and accentuate  high wear areas and the larger paint chips as well as areas that water spray hits or  would run down the plating. lastly the whole thing is blended with a little bit of off white to even out the finish and give it some uniformity and add one more level of depth to the finish.   

I took some more pics today out in the sun it just needs the final touches. you can see all the pics I have here http://img413.imageshack.us/g/dsc01411e.jpg/

here are just a few


Grossekatz

  • Guest
Re: New Member SS223 build
« Reply #16 on: 26 Jul , 2010, 22:59 »
Quote
WHOA!!! I just realized that I made a serious screw-up. There ARE several major, exterior difference between EB/ Manitowoc and Portsmouth/Mare Island boats.
First, the anchor is on the starboard side, on PNSY boats and Port on The EB boats. And the companion way, on the forward deck, is offset in the same way. But beware. On some boats, the companion way, was centerline. I was on one. But it had been Guppied, and I don't know if that was the reason. Check pictures of the boat, you're building, and see what they show.
As a side note; Silversides was built with port and starboard anchors. But the port anchors were removed, and the wells plated over, before completion.

 Yea, I have a good pic of the deck and it shows the companion way offset to the right. I actually picked the boat I was going to do off Rocketts metal deck  list, it was there as a metal deck EBCO boat. So I did some reading up on it liked the history of the boat and thought it would be an easy enough conversion because the hulls were laid out vey similar. As it turns out  the details of the fairwater are very different from a late boat to a mid war one and I spent 10+ hours adding rivits to the fairwater after I chopped off all the lockers to back date the thing. I now have a very serious love/hate relationship with Archers waterslide rivits.

Offline Siara

  • Admiral2
  • *
  • Posts: 888
  • Gender: Male
    • Master Models
Re: New Member SS223 build
« Reply #17 on: 28 Jul , 2010, 01:30 »
Nice color mapping Grossecatz. Looking really good.

Offline Rokket

  • Administrator
  • *
  • Posts: 2,362
  • Gender: Male
  • Submarine Enthusiast
    • AMP - Accurate Model Parts
Re: New Member SS223 build
« Reply #18 on: 28 Jul , 2010, 03:37 »
Wow, thanks for the details, love the info -and the build!
AMP - Accurate Model Parts - http://amp.rokket.biz

Offline TAS

  • Midshipman Cadet
  • *
  • Posts: 17
Re: New Member SS223 build
« Reply #19 on: 28 Jul , 2010, 06:22 »
Great work on the Conning Tower. How about elaborating on that "love/hate" relationship with those Archer rivets.

Grossekatz

  • Guest
Re: New Member SS223 build
« Reply #20 on: 28 Jul , 2010, 13:33 »

Quote
Great work on the Conning Tower. How about elaborating on that "love/hate" relationship with those Archer rivets.

I ended up using about half a sheet of the smallest rivits avaliable and while the affect is great it took forever to get them on right. The backer is super thin so they tend to wander all over the place especially once a coat of solvaset is on. I ended up scraping and re-doing quite allot of them much to my frustration. But they look great and are nearly the same size and have the same spacing of the kit rivits.


Offline Sniperonzolo

  • Lieutenant (jg)
  • *
  • Posts: 73
Re: New Member SS223 build
« Reply #21 on: 10 Aug , 2010, 09:29 »
meow!
i love it!!! specially the TBT!
What about lateral navigation lights on conning tower?

great wark

Grossekatz

  • Guest
Re: New Member SS223 build
« Reply #22 on: 12 Aug , 2010, 02:50 »
Thanks, the lights are the kit part. I used them seeing as I could not find a pic that showed them relocated to the tower sides. I have been filling allot of blanks in with launch pics of Cero.
The hull is nearly ready for primer I will post some more shots once I get a coat on her.