Author Topic: 1/400 U-48 WIP  (Read 36871 times)

0 Members and 1 Guest are viewing this topic.

Offline SG

  • Admiral
  • *
  • Posts: 661
    • https://3xblackcats.wordpress.com/
1/400 U-48 WIP
« on: 09 Nov , 2011, 16:14 »
Hi!
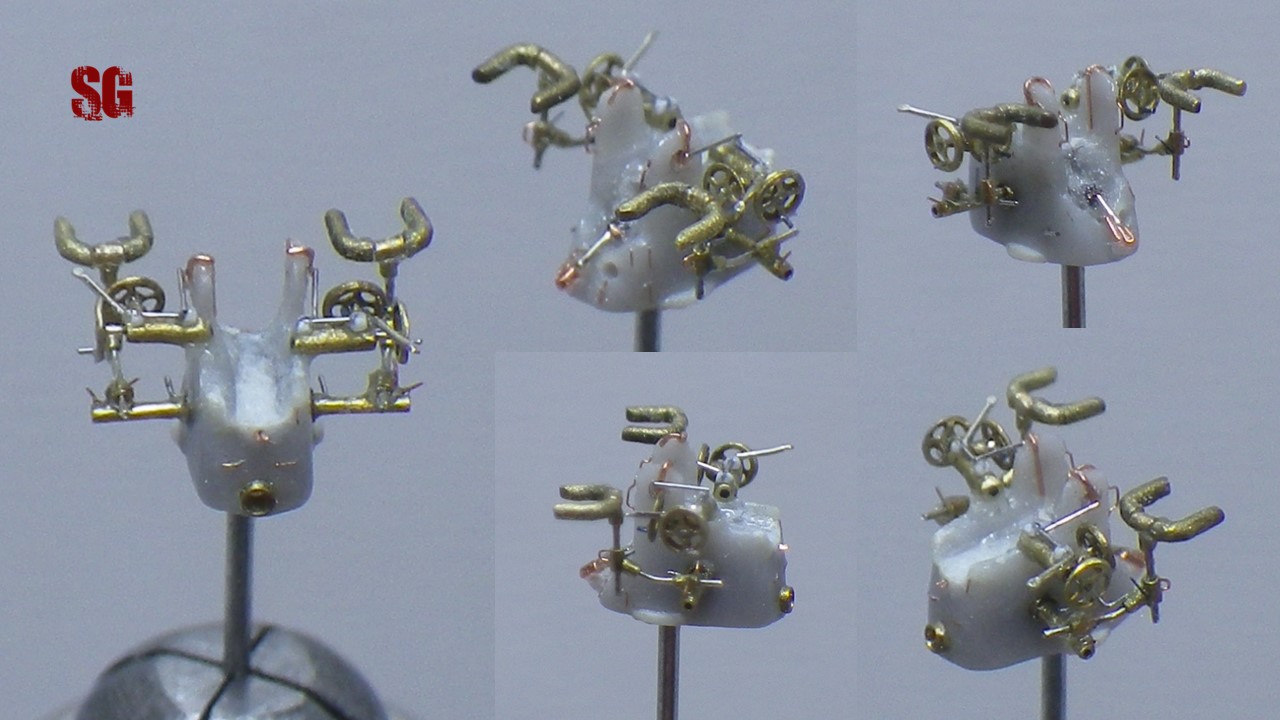
some WIP, the 20mm gun.
I used WEM PE as a base which served as a template for the main body of the gun. The rest of it was superdetailed w 0.13mm styrene, stretched sprue, 0.13mm copper wire and pieces of super-thin 1/700 PE railings from L'Arsenal (a propos, I wish to thank Mr Druel at L'Arsenal for the quality of his products and for being so kind and sharp w the shipments).
The 21 (!) pieces were assembled mainly w CA and there are also two welds. YES, micro-soldering is feasible and am grateful to Glenn Cauley (and indirectly to Siara) for opening my eyes on the matter and sharing his excellent technique, which proved to work even for the smaller scale.
Building work on my U-48 goes on slo-mo due to hospital work and some "technical problems":it had taken me nearly a month to build almost completely the first AA gun when it flew-off (while I was handling it with tweezers-aargh!!) and was never to be found again... i had to start all over again and here's the result. 
Suggestions, critics and tips are more than welcome!
SG


Unfortunately the "phi-shaped" aiming device in the foreground is barely visible in the pic and confounds with the top of the gun also made w "much" thicker stretched sprue. it's made of super-thin stretched sprue glued w tamya cement and was really painful to assemble and glue to the gun's L-support ;D


"The Three Amigos" (from L to R): WEM PE, my AAgun and the one by Mirage Hobby


« Last Edit: 05 Jul , 2013, 04:37 by SG »

Offline NZSnowman

  • Admiral4
  • *
  • Posts: 2,419
  • Gender: Male
  • U-1308
    • U-1308 - Wikipedia
Re: 1/400 U-48 WIP
« Reply #1 on: 09 Nov , 2011, 17:55 »
It's look a little small ;)

WOW... Great work!!!

Offline SG

  • Admiral
  • *
  • Posts: 661
    • https://3xblackcats.wordpress.com/
Re: 1/400 U-48 WIP
« Reply #2 on: 09 Nov , 2011, 23:07 »
Tiiiiiny! ;D Thx NZ!

Offline Rokket

  • Administrator
  • *
  • Posts: 2,362
  • Gender: Male
  • Submarine Enthusiast
    • AMP - Accurate Model Parts
Re: 1/400 U-48 WIP
« Reply #3 on: 11 Nov , 2011, 01:05 »
WOW! Really can't use that word enough. It's a good amount of detail, and then look at the scale, that kicks it to amazing! MUCH better than either the PE flat one, or the kit. Worth the effort for the results.
AMP - Accurate Model Parts - http://amp.rokket.biz

Offline Greif

  • Admiral2
  • *
  • Posts: 755
  • Gender: Male
Re: 1/400 U-48 WIP
« Reply #4 on: 11 Nov , 2011, 01:57 »
Simply superb work SG. :o  The quality is beyond words really.  My compliments.

Ernest

Nevermind4712

  • Guest
Re: 1/400 U-48 WIP
« Reply #5 on: 11 Nov , 2011, 05:52 »
Uff,..this is small, very small,..if i get the half of this Quality in 1/72,..im happy :-\

Really good Work!!:)

Offline Anakin

  • Sir Submarine
  • Lt Cdr
  • *
  • Posts: 220
  • Gender: Male
Re: 1/400 U-48 WIP
« Reply #6 on: 11 Nov , 2011, 10:46 »
And what do you do for living? I

Offline SG

  • Admiral
  • *
  • Posts: 661
    • https://3xblackcats.wordpress.com/
Re: 1/400 U-48 WIP
« Reply #7 on: 12 Nov , 2011, 10:22 »
Thank you very much Gentlemen, your comments are a big morale booster..and yes, am a surgeon though not a "micro"-surgeon!  ;D
Thanks again, next WIP posting ASAP
SG
« Last Edit: 12 Nov , 2011, 10:24 by SG »

Offline SG

  • Admiral
  • *
  • Posts: 661
    • https://3xblackcats.wordpress.com/
Re: 1/400 U-48 WIP
« Reply #8 on: 03 Jul , 2015, 12:35 »
Hi, several years have passed since i last posted on this thread. Am happy to report that work goes on slooowly at the U48 shipyard, I hope to be able to complete the 8.8 cm gun by the end of 2015. The gun has proved so far to be a hard nut to crack, "a model in a model" actually. Hectic work and a nasty heatwave hitting the country these days have recently caused another temporary stop of my project.
I did some research instead. One of the less clear aspects of U48 when the boat sported the lateral air trunks is represented by the turret handrails and grip handles pattern. I have been collecting quite a number of pictures to compose the handrails puzzle over the years (unfortunately there's no picture of U48 turret sides showing a clear/entire view of the handrails) but it's only recently that i managed to clarify what I think the handrails' pattern looked like, after a careful study of the turret details of U48's sister boats: U47 and U46.
The picture below summarizes the main handrails features of the three boats: while U47 had an uninterrupted handrail running along the entire turret side and below the trunk, U48 and U46 had three distinct  handrails sections (which I named "fore"-section,"trunk"-section and "after"-section) set on different levels: "fore-" and "after-"sections ran very close to the turret sides and ended into the trunk's fore and after margins with an upward curve, while the "air trunk-"section contoured the outer edge of the trunk. The details of the after-section (arrows) in U48 are very difficult to verify due to poorly defined pictures showing the boat sides and because of shots missing the after turret-sides. I recently came across a picture of U46 at the time when she sported the lateral trunks and the mystery was finally solved.


[/I have modified a great artwork by Dougie, drawing what i think U48's handrails pattern looked like. "Fore-" and "after-" sections in red, "trunk-section" and grip handles in light blue. The  two grip handles on the lateral air trunk side were similar to U47 ones: the lower one consisted of a metallic step next to a slot made into the trunk itself. The U46 picture doesn't seem to show any grip handle nor slots on the air trunk side but i might be wrong.


Please, let me know if you agree with my conclusions. If you own any detailed picture of U48 turret sides (lateral air trunk configuration) showing the handrails don't hesitate to let me know: it would be a blessed help.
Cheers
SG       
« Last Edit: 17 Aug , 2015, 02:35 by SG »

Offline Rokket

  • Administrator
  • *
  • Posts: 2,362
  • Gender: Male
  • Submarine Enthusiast
    • AMP - Accurate Model Parts
Re: 1/400 U-48 WIP
« Reply #9 on: 18 Jul , 2015, 21:34 »
Glad you are back on the project. You've done a lot of esearch1 Hopefully Dougie knows...
AMP - Accurate Model Parts - http://amp.rokket.biz

Offline dougie47

  • Administrator
  • *
  • Posts: 758
Re: 1/400 U-48 WIP
« Reply #10 on: 19 Jul , 2015, 05:10 »
Hi SG,
 
I think you have got all the details correct. It would be nice to get perfect photos but, yes, I think you are right.
 
Cheers,
 
Dougie

Offline SG

  • Admiral
  • *
  • Posts: 661
    • https://3xblackcats.wordpress.com/
Re: 1/400 U-48 WIP
« Reply #11 on: 22 Jul , 2015, 11:50 »
Thanks to both of you for stopping by. Am glad that my conclusions make sense Dougie!
Cheers,
SG


Offline TristanR

  • Lieutenant (jg)
  • *
  • Posts: 62
Re: 1/400 U-48 WIP
« Reply #12 on: 15 Aug , 2015, 12:46 »
HI SG, this is some impressively small work here!

Offline SG

  • Admiral
  • *
  • Posts: 661
    • https://3xblackcats.wordpress.com/
Re: 1/400 U-48 WIP
« Reply #13 on: 17 Aug , 2015, 02:32 »
 ;D  Thank you! Am working on the 8.8 cm gun now which is driving me nuts.
 
« Last Edit: 17 Aug , 2015, 02:55 by SG »

Offline SG

  • Admiral
  • *
  • Posts: 661
    • https://3xblackcats.wordpress.com/
Re: 1/400 U-48 WIP
« Reply #14 on: 18 Nov , 2015, 08:25 »
Hi, i've been going through many pictures of the 8.8 gun lately (yes, am still working on the gun as you can obviously guess ;D ) and found that U48 gun pedestal probably had one (?drain) hole in its starboard/aft part. At first i thought it might have been a shadow projected by the circular opening in the above-located pedestal fairing, but carefully examining the pictures i found that the "shadow" has a lighter rim (picture below, bottom left), which makes it a hole. The picture below is a composition of images of U48 and in the left ones the (?)hole can be seen clearly


I tried to verify if the hole was single or part of a pattern of three holes (2 posterior left and right, 1 anterior central) just like in the openings of the C 30/37 mount for the 2 cm Flak 30 gun, but found no evidence of it in U48; I therefore hunted for pictures showing the after part of the pedestal and the result is somewhat puzzling: most of the boats don't seem to sport any opening in that part of their gun pedestal, only U 570 (picture below, top Left) seem to show the hole/shadow, while the "naked" pedestal on the top Right of the composition below has none. What astonished me is that i found another picture (image below, bottom, central pic) which shows a faint, circular outline in that very same area (red arrow). I therefore speculated the existence of some sort of plug for a possible drain hole which maybe had gone missing on U 48.


Too much imagination? maybe. What do you think about that? are you aware of any opening in that part of the pedestal or have pictures showing it? Let me know, am very curious to know
Thank you
« Last Edit: 18 Nov , 2015, 08:36 by SG »

Offline SG

  • Admiral
  • *
  • Posts: 661
    • https://3xblackcats.wordpress.com/
Re: 1/400 U-48 WIP
« Reply #15 on: 24 Nov , 2015, 11:34 »

Hi, after examining a picture showing U 93's gun (below, right) i finally found evidence that the "round shadow" on the gun's pedestal (see previous post) is definitely a hole.
Magnifying another picture of U 48's gun (below, left) I found another round shadow on the starboard side of the gun's pedestal: is it a hole or a shadow? In case it's a hole this would account for (at least) 2 holes in the pedestal: one at  5 and the other at ?7 or 9 hr.
What do you think of that? I definitely need your help!
   
 
« Last Edit: 24 Nov , 2015, 13:00 by SG »

Offline NZSnowman

  • Admiral4
  • *
  • Posts: 2,419
  • Gender: Male
  • U-1308
    • U-1308 - Wikipedia
Re: 1/400 U-48 WIP
« Reply #16 on: 24 Nov , 2015, 11:59 »
I believe the hole is for a grease nipple.

Offline SG

  • Admiral
  • *
  • Posts: 661
    • https://3xblackcats.wordpress.com/
Re: 1/400 U-48 WIP
« Reply #17 on: 24 Nov , 2015, 12:09 »
 ;D  hehehe yes, but starboard side also? Great information Snowman
« Last Edit: 24 Nov , 2015, 12:11 by SG »

Offline NZSnowman

  • Admiral4
  • *
  • Posts: 2,419
  • Gender: Male
  • U-1308
    • U-1308 - Wikipedia
Re: 1/400 U-48 WIP
« Reply #18 on: 24 Nov , 2015, 12:17 »
;D  hehehe yes, but starboard side also? Great information Snowman

Maybe one for a bearing and one for the sliding plate???  ::)

Offline SG

  • Admiral
  • *
  • Posts: 661
    • https://3xblackcats.wordpress.com/
Re: 1/400 U-48 WIP
« Reply #19 on: 24 Nov , 2015, 12:43 »
Ha! good one, Simon!
I Just checked my database of pedestal pictures (hahahahahaha ;D ) and found the evidence I was after! below Right: the starboard side of an unidentified U-boat gun's pedestal: the same faint circular outline i had found on the port side of another pedestal's picture i had posted previously (below, Left): the holes (starboard and port) on U48's pedestal match perfectly with the outlines found on two different U-boat gun pedestals. So, the holes were there and  it looks like they had covers too! Moreover, the starboard side hole seems to be located after than the port side one: let's say the port one's at 8 and the starboard's at 5 hr, but perspective might be deceiving. I am very happy of this finding and hope that it can be useful to the Uboat modellers community (especially those modellers working with larger scales)


« Last Edit: 01 Oct , 2021, 11:43 by SG »

Offline OldNoob

  • Commander
  • *
  • Posts: 327
Re: 1/400 U-48 WIP
« Reply #20 on: 24 Nov , 2015, 14:26 »
Amazing work SG!

Offline SG

  • Admiral
  • *
  • Posts: 661
    • https://3xblackcats.wordpress.com/
Re: 1/400 U-48 WIP
« Reply #21 on: 25 Nov , 2015, 12:37 »
Thank you OldNoob!  ;)

Offline SG

  • Admiral
  • *
  • Posts: 661
    • https://3xblackcats.wordpress.com/
Re: 1/400 U-48 WIP
« Reply #22 on: 15 Apr , 2017, 05:49 »
Hey! It's been a while. I've been unwell lately and am slowly recovering. This meant hitting the pause button for my project. There was something, however, that i wanted to share with you, which is the blog showing the details of my build, what i've been able to achieve over the years, with plenty of description and research. Though the blog's been active from 2014, i never tried to advertise the site because i had planned to do that once the 8.8 was ready, but life's short and it's probably like some among you would enjoy my work and benefit from what i have been experiencing and learning. After all it's just a matter of sharing things and experiences and i dont want mine to be wasted.
In the "about" section you will find the story of my project and a few words of appreciation for the AMP forum and for all of you, Gentlemen. I hope you'll enjoy my efforts.
https://3xblackcats.wordpress.com/
Cheers
SG
« Last Edit: 28 Aug , 2018, 04:11 by SG »

Offline SG

  • Admiral
  • *
  • Posts: 661
    • https://3xblackcats.wordpress.com/
Re: 1/400 U-48 WIP
« Reply #23 on: 28 Apr , 2019, 10:26 »
Shop is open again:


http://u.cubeupload.com/SGm/sight.jpg


Yikes!
« Last Edit: 28 Apr , 2019, 11:13 by SG »

Offline SG

  • Admiral
  • *
  • Posts: 661
    • https://3xblackcats.wordpress.com/
Re: 1/400 U-48 WIP
« Reply #24 on: 27 Mar , 2020, 18:19 »
Hi, I am still completing the pieces of the gun sight superstructure and I need some advice about a gun component, a bar parallel to the main axis of the gun tube which is placed right on top of the after section of the tube, linking to the base of the sight (Pic 1, arrows). Was it a stabilizer? Do you have a name for it? As far as I know there were at least two main variants of the 8.8 cm naval gun equipping U-Boats. One variant sported the bar and the other didn't. Artworks and technical drawings usually don't show the bar. (Pic 1, bottom)


http://cubeupload.com/im/SGm/Pic1.jpg


My problem is trying to understand which gun variant equipped U 48. Some pictures don't seem to show the bar (Pic 2), even the close-up on the left apparently doesn't show it, at least this is what my eye catches:


http://cubeupload.com/im/SGm/Pic2.jpg


While another picture of U48, which i compared to a beautiful closeup of U 564's gun, seem to confirm the same gun configuration as U 564 (Pic 3) 


http://cubeupload.com/im/SGm/Pic3.jpg


Am puzzled. It is possible that U 48 had been equipped with the two different variants in different stages of her career? Which variant should i go for: "bar" on "non-bar"?


SG


« Last Edit: 26 Oct , 2021, 04:16 by SG »

Offline dougie47

  • Administrator
  • *
  • Posts: 758
Re: 1/400 U-48 WIP
« Reply #25 on: 28 Mar , 2020, 15:32 »
Hi SG,

Really glad to hear you are recovering, my friend.

I have seen a photo of U 47 after the Scapa Flow raid just as the boat went into refit. The photo shows that the first thing they did was remove the 88mm by crane even before the crew went on leave. I am not sure if the same 88mm was then fitted back at the end of the refit. Or they may have then fitted a completely different 88mm which may have been new or overhauled.

The point I am trying to make is that it is likely that U 48 had quite a few different 88mm guns during its illustrious career.

Can I ask when are you depicting U 48?

Sending my best to you and everyone in Italy.

Best regards,

Dougie

Offline SG

  • Admiral
  • *
  • Posts: 661
    • https://3xblackcats.wordpress.com/
Re: 1/400 U-48 WIP
« Reply #26 on: 29 Mar , 2020, 03:05 »
Hi Dougie! first of all thank you for the wishes and for the kind message regarding the virus spread you did with Wink. We're living difficult times, shutdown, isolation, but am confident: all is cyclic in nature, there's always calm after a storm. So let's wait and take all the precautions not to get infected, there's nothing more we can do actually.


Yes it's probably like that U48 changed a number of 8.8s. that was my guess also, your input is crucial to confirm it, so double thank you. I am depicting U48 in the period june-October 1940 (sixt to ninth war patrol, under Rosing or Bleichrodt). In that period the boat sported the lateral trunks on her conning tower.


I've been studying chronology of pics as far as possibile and i noticed three streaks of ?grease/rust on the port side of the gun breech (visible in picture 3, previous post, taken at sea while moving a torpedo from the underdeck stowage to the torpedo room). The same stained breech is also visible in the picture where the sailors show the attack computer at the end of Bleichrodt command (picture below). So that same gun with "the bar configuration" was there during the period U48 was equipped with the trunks.

http://cubeupload.com/im/SGm/U48Calculateur.jpg


In this period U48 might have sported the 8.8 version with the "bar" as in pic 3 of my previous post, so I think am gonna be adding it to the 400th scale gun. A propos, any idea of what the bar is and what's its correct name? a stabilizer, a mere protected connector to the sight acting as a pedestal as well, since it bridges from the sight to the aiming device?.
I'll keep updating this thread as i take some more pictures of my progress. The aiming block pieces are nearly completed, they are SMALL. A few examples:

http://cubeupload.com/im/SGm/elevation.jpg

http://cubeupload.com/im/SGm/IMG1829.jpg

http://cubeupload.com/im/SGm/IMG2076.jpg

Then i'll be trying to bring it all together to buid a full gun tube. Let's see what i can get.
Stay safe. Keep modelling and researching, all my best

SG


« Last Edit: 15 Nov , 2022, 10:38 by SG »

Offline dougie47

  • Administrator
  • *
  • Posts: 758
Re: 1/400 U-48 WIP
« Reply #27 on: 29 Mar , 2020, 14:26 »
Hi SG,

Well done on noticing the rust stains to work out the chronology. Dating photos is quite fun and using things like rusts stains or which base it is (Lorient or Kiel for example) really helps to find out if features on a boat were there at a specific time.

I am not sure about the bar as the 88mm is beyond what I normally research. I guess what is important is to work out if it has some form of actual function. Do you think there was some form of connector inside the bar?

Cheers,

Dougie

Offline SG

  • Admiral
  • *
  • Posts: 661
    • https://3xblackcats.wordpress.com/
Re: 1/400 U-48 WIP
« Reply #28 on: 30 Mar , 2020, 04:01 »
Dougie, I totally agree with you. Photographic research is funny, it is sometimes frustrating when pictures lack that perfect angulation you need or when something or someone gets in between and hides the detail you're after (those sailors with the attack computer for example ;D ) but yes, overall very intriguing.


The bar: no ideas, just mere speculation due to the fact that it connects the lead sight with the aiming device. The best book about naval armaments i found is Miroslaw Skwiot's "German Naval Guns 1939-1945". A spectacular book and very thorough, plenty of fine pictures, 3d artwork and technical drawings, which i recommend. The book however takes for granted the reader's knowledge of weapons terminology and gun components and thus lacks such information. Some 8.8 gun terminology can be found in the type VII volume of Anatomy of the ship, but that's far from being thorough. I am no expert of guns either and found myself confronted by a gun that has become "a model in a model": i wish i'd known more about it. So I was hoping in some help from the experts in the forum.


« Last Edit: 16 Dec , 2020, 10:50 by SG »

Offline SG

  • Admiral
  • *
  • Posts: 661
    • https://3xblackcats.wordpress.com/
Re: 1/400 U-48 WIP
« Reply #29 on: 01 May , 2021, 13:01 »
Hi,
it is with an immense pleasure that I announce that the gun project moves forward: I completed the main sight and scratchbuilt all the components of what i call the "superstructure" (the gun sight complex). Now it's time to bring them all together. Building the main sight was a gigantic (?or should i say liliputian  ;D ) effort that almost drove me insane and nearly forced me to abandon the project. My research (Dougie's input was providential, am very grateful) showed that U48 sported the gun version with no bolted joints for the deflection setting dial arm (b/w pic). This is what i managed to get, I hope you like it:


links to bigger pics:
https://u.cubeupload.com/SGm/sighta.jpg
https://u.cubeupload.com/SGm/mainsight2.jpg
https://u.cubeupload.com/SGm/mainsight1.jpg
https://u.cubeupload.com/SGm/5c9sight.jpg

If you're interested, you can find the details of the build in my blog, gun section.
Cheers,
SG
« Last Edit: 02 May , 2021, 02:12 by SG »

Offline dougie47

  • Administrator
  • *
  • Posts: 758
Re: 1/400 U-48 WIP
« Reply #30 on: 02 May , 2021, 04:23 »
Hi SG,
Really glad to see you moving forward with your mini U 48. Is there a subgenre called micro-modelling? If so you are leading the way.

Keep up the good work.
Dougie

Offline SG

  • Admiral
  • *
  • Posts: 661
    • https://3xblackcats.wordpress.com/
Re: 1/400 U-48 WIP
« Reply #31 on: 15 May , 2021, 13:36 »
Hi,
some more progress: the main sight base/mount with its pillars (which refused to glue), and the longitudinal bar linking to the sight mount, glued to the aft part of the guns' tube, 9 pieces.


https://u.cubeupload.com/SGm/sightbase.jpg


The main sight finally sitting on the gun. The first and most-difficult-to-build sub-assembly so far, total of pieces: 24   :o !  Odourless CA didn't work poperly and the sight, but mostly the pillars, detached several times. Old fashioned Loctite Superglue saved the day eventually.


https://u.cubeupload.com/SGm/mainsightdef.jpg


The ensamble next to the tip of my index finger: veeery small!


https://u.cubeupload.com/SGm/IMG5202.jpg

Next: the deflection setting block, God help me ;D
Cheers,
SG
« Last Edit: 04 Nov , 2021, 01:55 by SG »

Offline dougie47

  • Administrator
  • *
  • Posts: 758
Re: 1/400 U-48 WIP
« Reply #32 on: 18 May , 2021, 14:55 »
Hi SG,
Thanks for posting progress. What is the diameter of the brass tube you used in the first image?
Nice that you don't have CA glue on your finger. I've been building tonight using the forthcoming PE set so have the usual mix of CA glue, paint and Humbrol filler over my fingers.

Cheers,
Dougie

Offline SG

  • Admiral
  • *
  • Posts: 661
    • https://3xblackcats.wordpress.com/
Re: 1/400 U-48 WIP
« Reply #33 on: 19 May , 2021, 08:31 »
Dougie, thanks for dropping by  8) 
the brass tube diameter is 0.8 mm (internal lumen of 0.6mm) and i have filed the top and bottom of the tubing section to simulate the flat top and to accomodate the recoil tray that will be glued to the bottom side of it. Also, the sides have been sanded to some extent, to help reducing the overall diameter of the tubing section. The reduction of the external diameter brought the 0.8 tube section to be some 0.6-ish mm wide, thus closer to the real dimensions of that section of the gun tube translated into the 400th scale, which M.Skwiot profiles state to be some 0.56 mm (thus -0.6 ish). The choice of a 0.8 tubing section was necessary because I have planned the gun tube to be a composition of telescopic tubing of 0.8, 0.6 and 0.4 mm (am using Albion Alloys brass tubing and must say the quality is excellent), 0.4 mm perfectly matches the actual dimensions of the barrel (0.43 mm translated into the 400th scale according to Skwiot's profiles). 


That mix of CA, paint and filler on your fingers means that your shipyard is rather busy at the moment! 8) so good, looking forward to see some in-progress pics soon!

Here at the SG Werke the work on the deflection setting block has already begun, it promises to look pretty convincing (progress pics asap).

Cheers,
SG
« Last Edit: 11 Aug , 2022, 11:18 by SG »

Offline dougie47

  • Administrator
  • *
  • Posts: 758
Re: 1/400 U-48 WIP
« Reply #34 on: 23 May , 2021, 14:09 »
Hi SG,
Thanks for the info, I must say that I couldn't manage anything like 0.6mm. I still manage to drop plastic parts on the floor and crawl about trying to find them. You would think I would have learned by now to not do this. Whatever you do please don't drop your parts or sneeze as we can't have you making them all over again.

Good you are moving to the deflector.
At the moment I'm building armoured boxes for U 481 in summer 1944. I'll then add the armoured plate at the front then the navigation lights which were different on U 481. I'll be using the forthcoming AMP set for the planked deck for this model. Also doing an SH-3H Sea King in 72nd scale for the Nimitz project. Unfortunately I bought SH-3A kits and need to modify them to the H model. I also want to start a 48th scale vacuform Avro Lincoln (kit is by Sangar). I think the nose on the Lincoln is really ugly so I may convert it to a Lincolnian which had smooth nose and tail (like a Lancastrian). So many projects to build.
Cheers,
Dougie


Offline SG

  • Admiral
  • *
  • Posts: 661
    • https://3xblackcats.wordpress.com/
Re: 1/400 U-48 WIP
« Reply #35 on: 29 May , 2021, 12:24 »

Way to go, Dougie! how many SH3 on board of Nimitz? can't imagine the effort to complete the entire air wing (F-14s A-6s etc etc). A titanic project! :o  looking forward to see the Nimitz and Lincolnian project shots soon!


Some progress with the deflection setting block, central and port portion. A composition of brass microtubes (0.7x0.2 mm roundel+ inner 0.3x0.3mm section in a 0.5x0.5mm section in which i carved a slot to host the 0.2x0.8mm section to represent the handwheel arm) glued w CA. Ah, icing on the cake: the "pin" in the middle of the "big wheel" is a 0.06mm  nickel wire section, protruding from the 0.3 section just the right few tenths of mm. Below: the real thing and the 400th scale version (thumbs and links to bigger pics, instant shots taken w my phone, sorry for the quality).
Very rewarding!
Cheers,
SG


https://u.cubeupload.com/SGm/IMG5751.jpg


https://u.cubeupload.com/SGm/IMG5752.jpg


https://u.cubeupload.com/SGm/IMG5758a.jpg


https://u.cubeupload.com/SGm/IMG5748a.jpg


https://u.cubeupload.com/SGm/IMG5750a.jpg
« Last Edit: 11 Jun , 2021, 05:16 by SG »

Offline SG

  • Admiral
  • *
  • Posts: 661
    • https://3xblackcats.wordpress.com/
Re: 1/400 U-48 WIP
« Reply #36 on: 17 Jul , 2021, 05:25 »
Hi,
the deflection setting block is somewhat completed, it only misses the handwheel, an L-shaped element on its top and the lower part of the toothed-crescent. They will be crafted and added after the block is positioned on the ensemble -> after part of the gun tube/recuperators. I hope to be able to start sub-assembling the gun over the next months, most of the components are ready now and just await to be assembled. This is my latest progress, I hope you enjoy it 


link to bigger pic:
https://u.cubeupload.com/SGm/deflectionblock2a.jpg


I spare you from the many technical details of this build but some more information can be found on the blog, gun chapter, if you're interested.
Cheers,
SG
« Last Edit: 11 Aug , 2022, 11:20 by SG »

Offline SG

  • Admiral
  • *
  • Posts: 661
    • https://3xblackcats.wordpress.com/
Re: 1/400 U-48 WIP
« Reply #37 on: 16 Aug , 2021, 11:14 »

Offline SG

  • Admiral
  • *
  • Posts: 661
    • https://3xblackcats.wordpress.com/
Re: 1/400 U-48 WIP
« Reply #38 on: 04 Sep , 2021, 12:22 »
Some more progress. Added:
- the starboard arm bridging from the deflection block to main sight and its bolted plate, (a)
- the "L" element on top of the deflection block port "wheel" (barely visible, (b)
- some minor corrections to the frontal foldable mount for the lead sight, (c)
- the transverse element immediately forward to the main sight base, which was a typical feature of U48 gun, (d)
- the recoil tray, (e) Hurrah!
- the bottom part of the starboard crescent, corrected with a few hours of extra-work, (f)

t


https://u.cubeupload.com/SGm/Subassembly1.jpg  (link to bigger pic)

The blog's updated too.


Cheers,
SG
« Last Edit: 09 Sep , 2021, 07:59 by SG »

Offline SG

  • Admiral
  • *
  • Posts: 661
    • https://3xblackcats.wordpress.com/
Re: 1/400 U-48 WIP
« Reply #39 on: 01 Oct , 2021, 11:21 »

Moreover, the starboard side hole seems to be located after than the port side one: let's say the port one's at 8 and the starboard's at 5 hr, but perspective might be deceiving.

Hi, after studying the 8.8 cm gun walkaround posted by Rabapla in the research pics section i finally restated my assumptions about the pedestal holes seen in b/w pictures. It's been speculated that the holes allowed lubrication of the pedestal mechanisms and there's photographic evidence that they were provided with covers.


https://u.cubeupload.com/SGm/pedestalholes.jpg

The holes are placed at 180 degrees from each other, they just sit at the opposite sides of the pedestal circumference. So, their actual and correct location is: starboard side 4hr and port side 10hr. I compared the hole sitings in the walkaround pics to the actual pictures of U 48 and found that the location perfectly matches, while the holes diameter differed in the two main gun variants that i have identified: the early version of the gun (such as the one equipping U46-47-48 and U 96, pic below) sported bigger holes, the late version (U552, U564 ect), which is the version pictured by Rabapla, sported smaller holes.


https://u.cubeupload.com/SGm/U48pedestalholes.jpg 

Am really grateful to Rabapla for posting those pictures, they are a real treasure, every detail of the gun is covered. It was great of him to share such a magnificent photographic collection with us.
Plus am happy that another little puzzle has been solved.


Cheers,


SG
 
« Last Edit: 04 Nov , 2021, 02:03 by SG »

Offline SG

  • Admiral
  • *
  • Posts: 661
    • https://3xblackcats.wordpress.com/
Re: 1/400 U-48 WIP
« Reply #40 on: 21 Oct , 2021, 09:30 »
Hi,
the gun tube complete with superstructure, breech and details is finally ready. The barrel just misses the muzzle cap line (which is 0.03mm-ish thin in the 400th scale). I am currently waiting for the delivery of 0.03 mm copper wire that I ordered from the chinese e-market (it's sold by hardware suppliers and it's meant for repairing mobile phones). The delivery is scheduled in December.
This subassembly and its superdetailing have been really tricky but fun. I hope you like the result of the last two months' efforts.


https://u.cubeupload.com/SGm/subassembly2.jpg

The inevitable research accompanying the build brought to light different variants of the main details I've dealt with. I am pleased to share my findings with you hoping they might be useful for your builds or just to enrich your general knowledge of the 8.8 gun (picture below).
- a) deflection block flywheel. Early type: three rays protruding posteriorly, late type: flat appearance. Same arrangement of the rays, knob and "curtain" aspect of the wheel profile opposite to the knob for both variants. Occasionally a saucer-like flywheel (no rays) resembling the flywheel for the deflection setting dial arm was observed.
- b) lower profile of the breech housing after portion: concave (early) versus flat look (late).
- c) breech block lever: longer/thinner (early) vs shorter/larger (late) look.
U 570 gun sported the 3 early details analyzed.


https://u.cubeupload.com/SGm/variants.jpg

Muzzle cap. (please don't hesitate to correct my terminology if you find it wrong).
I identified at least three main variants of muzzle cap (a, b, d) and an oddity (c). They mostly differ by the locking handle shape and lenght.
- U 48 early variant (a) photographed immediately before the boat's seventh war patrol. The locking-handle followed the locking fairing profile bending and extending posteriorly. Quite a rarity, i guess the guns equipping U 48 sister boats might have been sporting this variant of muzzle cap too.
- Standard early variant (b): long locking handle not protruding over the sides.
- Unusual variant (c): probably a (b) variant pictured in a shot blurred at the muzzle, dunno, help me w that.
- Standard late variant (d): shorter locking handle. The most frequently seen variant of muzzle cap. the Bottom row of the picture collage shows late muzzle caps in their housing on the C/35 mount (middle pic: U 48 gun in action during the 9th war patrol, note the switch to the standard late variant) and (bottom right picture) a closeup of the dangling cap paired with the locking handle only, the locking fairing gone awol for some reason.


https://u.cubeupload.com/SGm/muzzlecapvariants.jpg

Cheers,

SG
« Last Edit: 11 Aug , 2022, 11:31 by SG »

Offline SG

  • Admiral
  • *
  • Posts: 661
    • https://3xblackcats.wordpress.com/
Re: 1/400 U-48 WIP
« Reply #41 on: 29 Nov , 2021, 12:14 »
Hi,
some more progress. I corrected the holes position according to photographic research and managed to complete the gun pedestal. The result is pretty convincing. (below: a starboard side, b port side)


https://u.cubeupload.com/SGm/pedestal.jpg

Cheers,

SG
« Last Edit: 29 Nov , 2021, 12:23 by SG »

Offline falo

  • Admiral
  • *
  • Posts: 514
  • Gender: Male
Re: 1/400 U-48 WIP
« Reply #42 on: 01 Dec , 2021, 04:08 »
Hello SG,

did you enlarge your fingers in Photoshop and at the same time reduce the size of the part?  ;)

Great work, I'm always amazed by your meticulous modeling skills. I'm looking forward to when you start painting, probably you have already prepared brushes for it that have only one - very short and thin - hair?  8)

Thanks fpr sharing and best regards
falo

Offline SG

  • Admiral
  • *
  • Posts: 661
    • https://3xblackcats.wordpress.com/
Re: 1/400 U-48 WIP
« Reply #43 on: 01 Dec , 2021, 09:15 »
Falo,
did you enlarge your fingers in Photoshop and at the same time reduce the size of the part?  ;)

the trick worked huh?  ;D ;D ;D ;D

I'm looking forward to when you start painting, probably you have already prepared brushes for it that have only one - very short and thin - hair? 8)

How do you know am bald? am actually letting grow one single hair for the purpose. When it reaches the desired lenght i'll be probably ready for the painting phase  ;D

Thanks for dropping by and double thanks for the compliments, glad you like my progress, am flattered 8)


Cheers,
SG
« Last Edit: 01 Dec , 2021, 11:20 by SG »

Offline dougie47

  • Administrator
  • *
  • Posts: 758
Re: 1/400 U-48 WIP
« Reply #44 on: 01 Dec , 2021, 12:46 »
Hi SG and Falo,
Great work, SG, I have no idea how you can make such small pieces. I complain when I mess up 72nd scale parts. Do you have a bench magnifier to see what you are doing? Or even a microscope :)
Cheers,
Dougie
 

Offline SG

  • Admiral
  • *
  • Posts: 661
    • https://3xblackcats.wordpress.com/
Re: 1/400 U-48 WIP
« Reply #45 on: 02 Dec , 2021, 00:17 »
Dougie,

I use an Optivisor with 7x magnification plus its monocle, which adds 3 dioptres more, useful to check for imperfections but not for working. I must admit that i recently switched to 10x magnification lenses, but the working distance must be reduced wearing those, so it's less comfortable. My unforgiving digital camera zoom is a useful tool to check for imperfections, glue excess or spaces to be filled once the pieces are assembled. I guess an optivisor is a very useful tool for modelling the bigger scales too. Try it if you haven't  been using one already, it changes your modelling perspectives for the better.

Thanks for your kind words, am happy you like the work. Next will be the gun mount with all the arms and the safety harnesses. A nightmare. have to re-craft some arms now that 0.2 tubing is available on the market (it wasn't years ago, when i originally crafted the lateral arms). Let's see.

Cheers,
SG   
« Last Edit: 02 Dec , 2021, 05:18 by SG »

Offline SG

  • Admiral
  • *
  • Posts: 661
    • https://3xblackcats.wordpress.com/
Re: 1/400 U-48 WIP
« Reply #46 on: 19 Dec , 2021, 10:35 »
I identified at least three main variants of muzzle cap (a, b, d) and an oddity (c). They mostly differ by the locking handle shape and lenght.
- U 48 early variant (a) photographed immediately before the boat's seventh war patrol. The locking-handle followed the locking fairing profile bending and extending posteriorly. Quite a rarity, i guess the guns equipping U 48 sister boats might have been sporting this variant of muzzle cap too.
- Standard early variant (b): long locking handle not protruding over the sides.
- Unusual variant (c): probably a (b) variant pictured in a shot blurred at the muzzle, dunno, help me w that.
- Standard late variant (d): shorter locking handle. The most frequently seen variant of muzzle cap.


Errata Corrige. After seeing the recently-published colourized version of the b/w pic (below, left) on the FB page " Das U-boot in farbe", I realized how much i have misinterpreted it. Comparing the two pictures i realized that i had mistaken one of the deck's drain holes (b) for the lateral section of the locking handle (a). In the b/w picture the images sum up looking like a single element. In fact, the locking handle had only a minimal lateral extension or none at all, and that makes sense: if the lateral branches were as long as i had originally thought, turning the handle would have been impossible due to the presence of the ring for the securing line. So dumb of me.
Therefore, I can now say with good approximation that only two versions of the handle existed: the early, long one (d), and the late shorter one (c). A recently-acquired U 48 picture confirms the new finding, so I decided to modify the locking handle that I had already crafted accordingly (e) (it was insanely difficult ;D  but turned out fine).


https://u.cubeupload.com/SGm/Tampion.jpg

Cheers,

SG
« Last Edit: 30 Dec , 2021, 01:16 by SG »

Offline SG

  • Admiral
  • *
  • Posts: 661
    • https://3xblackcats.wordpress.com/
Re: 1/400 U-48 WIP
« Reply #47 on: 12 Jun , 2022, 09:10 »
Gentlemen,
the mount is ready. It took me six months to assemble all the tiny components, it was kinda extreme, but undoubtedly fun. A few pics:


https://u.cubeupload.com/SGm/mountAMP1.jpg


https://u.cubeupload.com/SGm/mountAMP2.jpg

This one's for Falo!  ;D

https://u.cubeupload.com/SGm/mountAMP3.jpg

Curiosities: did some research and identified different styles of the main details adorning the mount. 1) Pillar top elements: early version, rounded edges (1a) vs sharp edges (1c) Pillar handles: early shorter version (1b) vs later/standard and longer version(1d). The shorter version sits higher than the longer version and has a less squared appearance. 2)Upper lateral arms superstructures:asymmetric/early configuration(2a) and mostly seen in pictures, the starboard arm superstructure sits lower than the contralateral; symmetric/late configuration (2b): both superstructures have the same height. 3) Locking lever for the foldable arm supporting the after portion of gun tube. Early/standard configuration mostly seen in pictures: portside location of lever(3a). Late configuration, seldom seen: starboard side-located lever (3b). 4) The pillar top elements had different shapes given the sides. The port side showed a semicircular additional posterior element (4a) that is missing on the opposite side(4b).The arms connecting the pintles to the upper arms superstructures had a different forward insertion to the superstructure. Port side: the arm inserts beneath the superstructure medial pillar (4c). Starboard side: the arm inserts above the superstructure medial pillar (4d). The arms could have different styles as well (4d, 4e). There was a plaque on the fore surface of the mount (5a) between the butterfly bolt and the tiny arms for reeling the muzzle cap line. The writing on the plaque said: behelmierung der getriebe deckel offnen (5a). Sometimes the plaque detached with use and went missing, just like in the case of U48 (5b).


https://u.cubeupload.com/SGm/mountstyles.jpg

Photographic research also revealed what was the function of the lever that can be seen at the bottom-after part of the mount portside. The finding was confirmed byMr Kai Steenbuck from the Cuxhaven U-Boot Museum to whom am grateful. He also translated the writing on the plaque next to the lever definitely confirming my assumptions. When the lever is shifted forward the mount is free to traverse, when it points backwards the mount is locked. Take into account this finding in case you are considering to build a model showing the manned gun in action or simply traversing during the torpedo loading.


https://u.cubeupload.com/SGm/mountlever.jpg

I hope you enjoyed the progress.

Cheers,

SG
« Last Edit: 02 Jun , 2023, 11:05 by SG »

Offline dougie47

  • Administrator
  • *
  • Posts: 758
Re: 1/400 U-48 WIP
« Reply #48 on: 14 Jun , 2022, 13:18 »
Hi SG,
You will need to do a full article to write this up. Photo 3 is just bonkers (insane) as it shows the ultra-small size. Is there a name for what you are doing? For example microscopic modelling? It is not possible to see the level of detail without a magnifying glass such as the handles on the round wheels.
You mighth want to consider writing for Finescale magazine when you are finished your project.
Cheers,
Dougie


Offline SG

  • Admiral
  • *
  • Posts: 661
    • https://3xblackcats.wordpress.com/
Re: 1/400 U-48 WIP
« Reply #49 on: 14 Jun , 2022, 16:19 »
Hi Dougie,
Thank you for the compliments! Am flattered.
I am just trying to do my best superdetailing a small scale model. There are many modellers that do pretty much the same in smaller scales like the 700th scale and reach even better results. Am thinking of legendary modellers such as Jim Baumann, Marijn Van Gils, EJ Foeth, Marek Targovicz, that have been inspiring me over the  years. Am happy the scale am dealing with is "only" the 400th one  ;D , which allows to reproduce most of the details the gun  featured. Anyway, the gun is pretty unique as, so far, I haven't seen one in the 400 th scale with the same degree of detail.
Am currently reporting the step by step  build on my blog ( https://3xblackcats.wordpress.com/2015/01/26/8-8-cm45-3-46-sk-c35-gun/ ) as a sort of diary, to share the techniques used to overcome the difficulties of the build and provide useful information for the modellers wanting to assemble a fully detailed 88 gun in any scale. It would be great to write an article about the different styles of the gun, the variants and the details that I have started to notice while researching. That would fill an important gap I guess. Someday I will probably do it. Publishing on a magazine would be great but I think I am light years far from completing my project. We'll see. Thanks again for your kind words, i am glad you understood the work behind it


Cheers,


SG
« Last Edit: 23 Jun , 2022, 11:25 by SG »

Offline falo

  • Admiral
  • *
  • Posts: 514
  • Gender: Male
Re: 1/400 U-48 WIP
« Reply #50 on: 28 Jan , 2023, 04:19 »
Hi SG, hi Dougie,


@SG: Is this your next project?   8)


https://www.kitreviewsonline.de/u-48-dkm-u-boat-type-vii-b-with-dock-in-1700-von-flyhawk-fh1101/


Regards
falo

Offline SG

  • Admiral
  • *
  • Posts: 661
    • https://3xblackcats.wordpress.com/
Re: 1/400 U-48 WIP
« Reply #51 on: 01 Feb , 2023, 09:08 »
 ;D ;D ;D ;D  Way too small Falo!


By the way, the gun project goes on silently but steady. I made good progress with the lower arms and the safety harnessess. I hope to be able to post a photographic update soon (SG Werke is shut due to Covid these days, wish me luck ;)


Cheers,


SG

Offline dougie47

  • Administrator
  • *
  • Posts: 758
Re: 1/400 U-48 WIP
« Reply #52 on: 02 Feb , 2023, 11:51 »
Hi Falo,
The drydock and photo etch looks fantastic but the scale of 700th would be hard to work with.
SG - hope you are on the mend from Covid and that your Werke can open again.
Cheers,
Dougie

Offline SG

  • Admiral
  • *
  • Posts: 661
    • https://3xblackcats.wordpress.com/
Re: 1/400 U-48 WIP
« Reply #53 on: 05 Mar , 2023, 10:11 »
Hi,
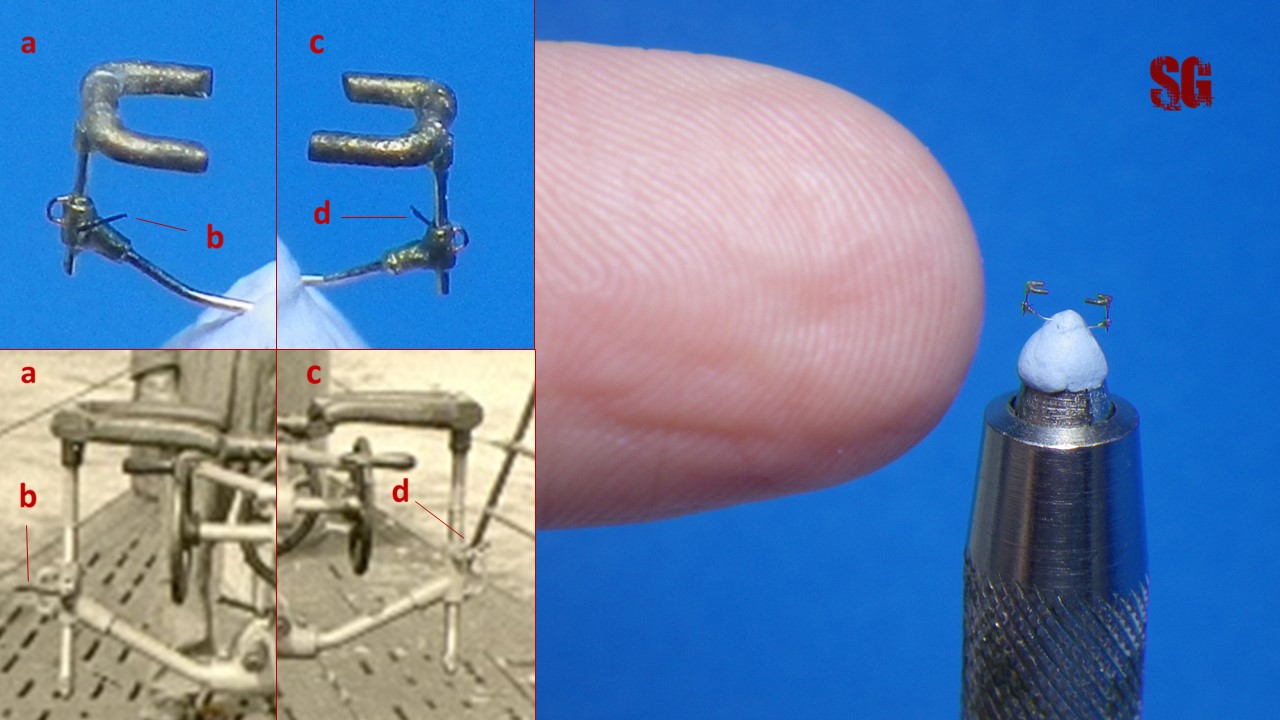
I finally managed to complete and superdetail the tiny elevation and traversing safety harnesses and to assemble them to the lower lateral arms and then to the gun mount. The insane feat took me 9 months with an average of 2 modelling sessions per week and plenty of intervals between the sessons. Unfortunately at this stage of the build each time a detail is added the risk of causing "the house of card" to crumble grows more and more. It has become increasingly difficult, time consuming and potentially disastrous.

Am therefore proud to show you the baroque-looking  ;D  result of my modelling efforts: 


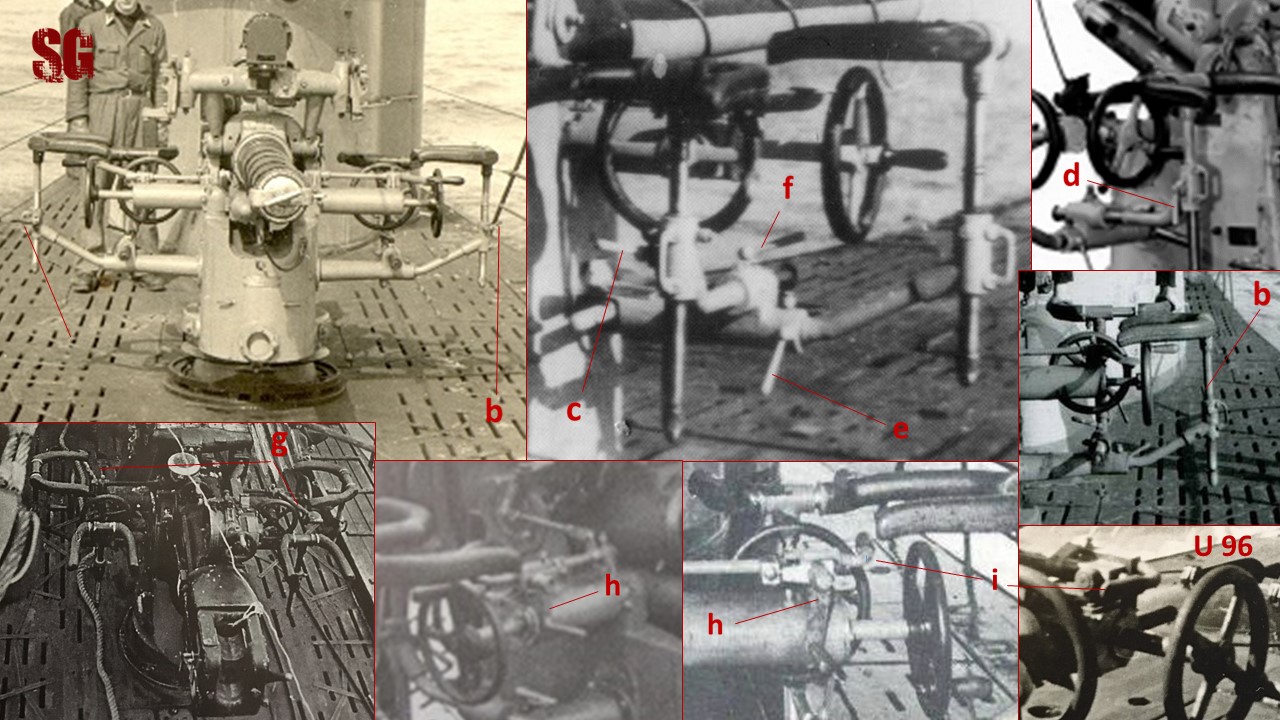
Curiosities. As usual, the in-depth photographic study of the gun components brought me to notice oddities and different styles: first of all the location of the adjusting handles. Elevation harnesses arms handles: starboard one located forward (unnamed arrow ;D), port one pointing aft (b). Lower arms adjusting handles: aft side of each main arm (e) and top of each transverse section (f). The traversing harnesses arms handles were located on the port side of each arm (c, d). "lambda" joints squared eyelets: early (right/top and right/center pics) eyelets sat higher than their late counterparts (top row, central picture). The upper arms levers (g) were an early feature. They had a very important purpose as they were the triggers to fire the gun.They branched with a 60-degree angle from the main axis of the upper arm. The starboard lever pointed aft while the port one pointed forward. I identified a different, apparently late variant made of a crank (h) pointing forward and a lateral L-shaped lever extending aft (i) which was probably the late version of the trigger lever. This variant equipped famous boats such as U 96, U 552, U 73 and U 203. U 96 and U 552 modellers you've been warned! ;D ;D


The superdetailed elevation harnesses waiting to be added to the mount and the usual comparison picture dedicated to Falo  ;D


Ah, the blog's updated too: https://3xblackcats.wordpress.com/2015/01/26/8-8-cm45-3-46-sk-c35-gun/ remember to scroll down to the bottom to see the latest progress if you decide to visit.

Cheers,
SG
« Last Edit: 14 Mar , 2023, 00:31 by SG »

Offline dougie47

  • Administrator
  • *
  • Posts: 758
Re: 1/400 U-48 WIP
« Reply #54 on: 07 Mar , 2023, 12:21 »
Hi SG,
Really good work, as always. Interesting you found a different style, I suppose we should expect differences between weapons and that styles would not be just on U-boats. The more we study, the more differences we find.
Cheers,
Dougie

Offline SG

  • Admiral
  • *
  • Posts: 661
    • https://3xblackcats.wordpress.com/
Re: 1/400 U-48 WIP
« Reply #55 on: 10 Mar , 2023, 01:42 »
Thank you Dougie, am happy you enjoyed my latest progress and yess, i agree with you, different styles also for the weapons. Gathering as many pictures as possibile of the boat one decides to build (including the weapons) is crucial. If the aim is to reproduce faithfully that given U-boat, i mean. Photographic research to me is one of the most enjoyable actvities linked to modelling. There's always something new to learn and to be surprised of. A great source of learning and a most intriguing investigating work.

Cheers,
SG
« Last Edit: 10 Mar , 2023, 08:20 by SG »

Offline falo

  • Admiral
  • *
  • Posts: 514
  • Gender: Male
Re: 1/400 U-48 WIP
« Reply #56 on: 20 Mar , 2023, 12:32 »
Hi SG,

my God, I would not have believed that Gulliver (the novel character of J. Swift I mean) now also travels in the submarine. Thank you for the photo it impressed me and pleased that you thought of me   ;)

Many greetings
falo

Offline SG

  • Admiral
  • *
  • Posts: 661
    • https://3xblackcats.wordpress.com/
Re: 1/400 U-48 WIP
« Reply #57 on: 20 Mar , 2023, 13:48 »
I would not have believed that Gulliver now also travels in the submarine.

 ;D ;D ;D ;D ;D ;D ;D ;D  my pleasure, Falo. Thanks for dropping by!

(the novel character of J. Swift I mean)

 PS: It's definitely him,  Alex and his "droogs" friends are not allowed on board ;D ;D ;D .
« Last Edit: 24 Mar , 2023, 06:34 by SG »

Offline SG

  • Admiral
  • *
  • Posts: 661
    • https://3xblackcats.wordpress.com/
Re: 1/400 U-48 WIP
« Reply #58 on: 28 Mar , 2023, 14:43 »
The gun has finally been completed, mission accomplished. The final assembly wasn't free from surprises and collateral damage, with several details breaking, detaching or simply flying off  ;D . All was patiently re-crafted, repaired and assembled again. Particular care was given to reproduce faithfully the lines for the muzzle cap and the breech plug. Here's the result:


Below: Gulliver is manning the gun, Falo! ;D ;D ;D ;D ;D


The gun was then dry-fitted to its pedestal. Both will be kept separated until their final assembly onto the submarine deck. The leaning forward is due to the unstable dry-fitting and it's just temporary. The bottom left pic compares the gun to its sibling provided in the submarine kit. Now you know the reason why i threw myself into this 9-year project and was so stubborn not to abandon it despite the high-and-lows of life  ;D ;DI would like to dedicate this important achievement to all of you and in particular to Tore. All my gratitude for the support received all over these years goes to our Dougie Martindale, to fellow modellers Marek Targowicz at Shelf Oddity, EJ Foeth at ontheslipway.com and to Mr Kai Steenbuck at the Deutsches U-Boot Museum. A toast to you all!


Cheers,


SG


PS the blog's updated: https://3xblackcats.wordpress.com/2015/01/26/8-8-cm45-3-46-sk-c35-gun/ . Once again, remember to scroll down to the bottom to see the latest progress if you decide to visit.
« Last Edit: 09 May , 2023, 09:14 by SG »

Offline falo

  • Admiral
  • *
  • Posts: 514
  • Gender: Male
Re: 1/400 U-48 WIP
« Reply #59 on: 29 Mar , 2023, 09:49 »
"The bottom left pic compares the gun to its sibling provided in the submarine kit."


Hello SG,

in contrast, the original from the kit is nothing more than a lump of plastic. I am at a loss for words for your skill and patience.


Best regards
falo

Offline SG

  • Admiral
  • *
  • Posts: 661
    • https://3xblackcats.wordpress.com/
Re: 1/400 U-48 WIP
« Reply #60 on: 29 Mar , 2023, 13:50 »
Thanks for the kind words Falo! Am happy you liked my 88. It's been a great adventure. I totally agree with you: that plastic gun is really awful ;D ;D ;D 

Offline dougie47

  • Administrator
  • *
  • Posts: 758
Re: 1/400 U-48 WIP
« Reply #61 on: 29 Mar , 2023, 14:30 »
Hi SG,
Really greta work. Congatulations on finishing the 88mm, it is a milestone in your project and you must be proud.
Cheers,
Dougie

Offline SG

  • Admiral
  • *
  • Posts: 661
    • https://3xblackcats.wordpress.com/
Re: 1/400 U-48 WIP
« Reply #62 on: 30 Mar , 2023, 00:14 »
Thank you Dougie!  ;)