Author Topic: U-45 WIP - Completed October 2019  (Read 105529 times)

0 Members and 7 Guests are viewing this topic.

Offline Siara

  • Admiral2
  • *
  • Posts: 888
  • Gender: Male
    • Master Models
Re: U-45 WIP
« Reply #90 on: 15 Mar , 2010, 01:50 »
Thats one good looking deck Bill.
Following it closely. ;)

Offline Mr. Bill

  • Commander
  • *
  • Posts: 274
Re: U-45 WIP
« Reply #91 on: 15 Mar , 2010, 05:42 »
Thanks Siara!  Here's a couple of additional images.  The first shows how far the deck "sits" down in the hull creating a very noticeable lip.  I think this can be easily resolved with some strip styrene inserted on top of the ledge of the kit part to bring the deck even with the edge of the hull.


These next two images show the modifications I made to the forward part of the deck.  This part of the Amati deck is very narrow and left a large gap where it should meet with the hull edge.  The force needed to bring the hull and deck together places far too much stress on the styrene hull and any glued joint would surely separate.  I cut this part off of the Amati deck and replaced with the similar section from the Revell deck.  Some trimming of the wide end of the Revell section was needed to match the width of the brass deck where the two meet.  The second photo shows the section cut from the Amati deck laid on top of the Revell part and the resulting gap.  Note the cross hatch pattern of the Amati deck - I don't believe this is accurate?  I am not entirely happy with the details on the Revell part - the series of holes in the steel plates of this section of deck are represented by raised bumps on the Revell part!  I will probably scratch build this section from styrene and drill the holes along with adding the other details.


I am still working on how to do the pressure hull details.  So far I can't decide on how much work I want to do in this area - something has to be added, but the visibility seems very limited.  How much of the pressure hull details can be seen once the deck is in place?

Your comments, advice, and questions are always welcome.

Cheers,

Bill
« Last Edit: 21 Apr , 2018, 07:09 by Mr. Bill »

Offline Siara

  • Admiral2
  • *
  • Posts: 888
  • Gender: Male
    • Master Models
Re: U-45 WIP
« Reply #92 on: 15 Mar , 2010, 15:27 »
 How much of the pressure hull details can be seen once the deck is in place?

Almost none. I wouldnt bother with it if i was making the model again.
I do like the new images Bill- stick with them.

Hey- did anyone notice- we have new ranks now.
« Last Edit: 15 Mar , 2010, 15:29 by Siara »

Offline Rokket

  • Administrator
  • *
  • Posts: 2,362
  • Gender: Male
  • Submarine Enthusiast
    • AMP - Accurate Model Parts
Re: U-45 WIP
« Reply #93 on: 18 Mar , 2010, 05:13 »
Observant Siara! Any suggestions welcome.

Mr Bil - looking sweet!

I did some conning tower p-hull work, but as Siara says, you really need a torch and squinting eyes to see anything.
AMP - Accurate Model Parts - http://amp.rokket.biz

Offline Pat

  • Captain
  • *
  • Posts: 395
Re: U-45 WIP
« Reply #94 on: 18 Mar , 2010, 15:19 »

How much of the pressure hull details can be seen once the deck is in place?


While I don't have final proof of it yet, I don't quite agree with Siara about not being able to see the p-hull detail.

Of course, it does require a LOT more work to make it visible.

On my build, I'm hinging all the major deck hatches, such as the ones over the spare torpedos and and loading hatches and the ones over the inflatable dinghy storage tubs.  This should not only let in a lot of extra light when in the open position, but also create large open spaces with which to see down onto the p-hull from certain angles.

I say that I don't have proof of it yet because I'm only at the stage where I've put in most of the framing under the wooden deck, but I've made similar hatches on lots of models of sailing ships and they let in enough light to be able see quite a bit of detail between decks while looking either down through the hatches and companionways or in through gunports along the side.

However, it IS a great deal of extra work.  The hardest part isn't actually making the deck or the hatches, it's making the tin ylittle hinges for each hatch but it is possible and there are several techniques for different sorts of hinges.

Offline Rokket

  • Administrator
  • *
  • Posts: 2,362
  • Gender: Male
  • Submarine Enthusiast
    • AMP - Accurate Model Parts
Re: U-45 WIP
« Reply #95 on: 20 Mar , 2010, 01:43 »
It's pretty black. The slots are tiny, the whole thing is painted almost black. With a searing bright light you might see some vague stuff, but...

I put frame ribs behind the limber holes, and a #D p-hull "nose" in the bow, and a half-pull in the stern, and a curved top down the center, but you really can't notice anything but the bow.
AMP - Accurate Model Parts - http://amp.rokket.biz

Offline Mr. Bill

  • Commander
  • *
  • Posts: 274
Re: U-45 WIP
« Reply #96 on: 20 Mar , 2010, 18:20 »
Greetings!

Worked on the forward watertight ammunition container yesterday and today and have a few photos to share.  The early VIIB's as built had only one watertight ammo container located near the 8.8 deck gun.  I believe that the later B's and C's had a second ammo container installed on the deck aft of the conning tower.  The Revell kit features this type of configuration.  I am not sure if the early B's were subsequently modified to include a second ammo container when the 20mm was relocated to the enlarged platform on the conning tower, but I think so.

The hatch design for the ammo container is slightly different on the early B's compared to later versions.  It has four "flanges" on the edge of the circular edge while later versions did not.  In addition, there is a noticeable gap between the hatch edge and the deck that is not visible on the later hatches.  The early hatch features can be seen in photos of U-47 and U-53, which I used as references as I could not find any images of the hatch on U-45.  I assume that U-45 and U-47 had the same hatch design.

Cutting the Amati brass deck is very difficult.  It is very thick and I had a few tense moments using a dremel to cut the brass away.  The result looks good to me, except for one small rough spot on the edge that I will try to fix later.

I am relieved that U-45 had only one of these hatches as I would not relish the thought of having to do a second hatch modification on that thick brass!

Right, on to the photos:


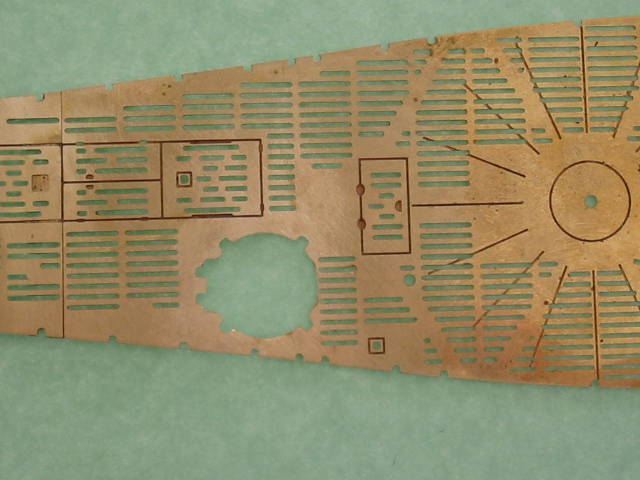
This image shows the cutout of the Amati deck.  If you compare to the image of the unmodified Amati deck in the early post, you can see the differences.


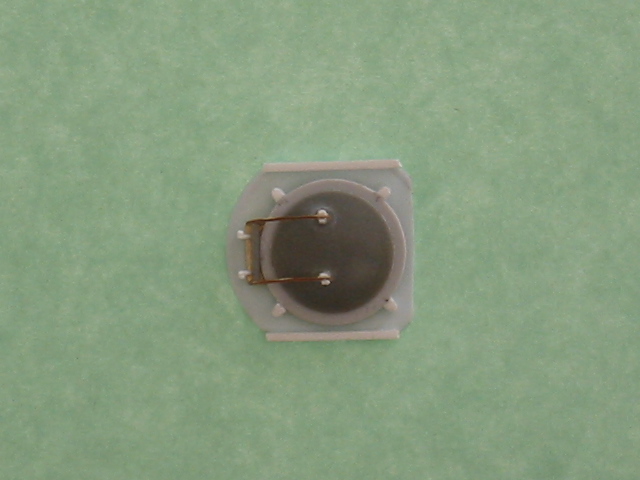
Here is the scratch built ammo hatch based on photos of U-47 and U-53.  Note the four flanges.


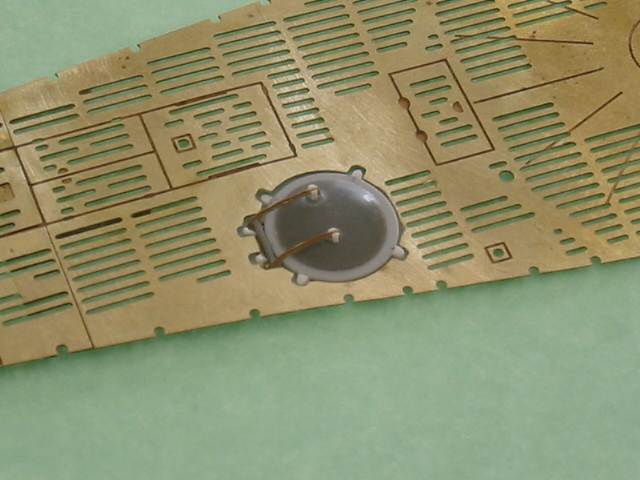
Ammo hatch dry fitted into the modified deck.


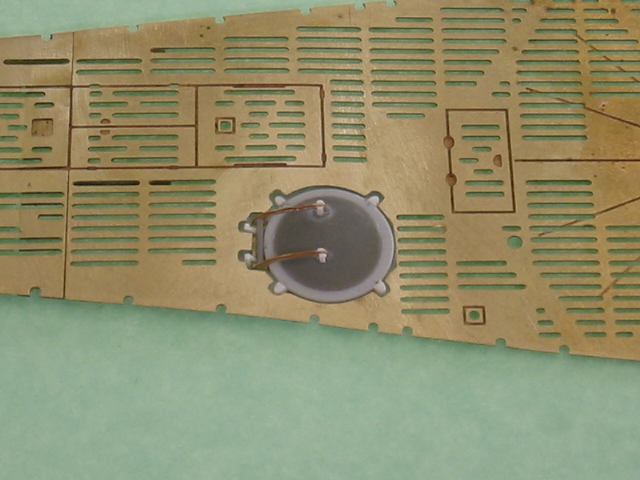
Another image of the hatch dry fitted.  You can just see the blemish on the edge of brass deck!


Last photo for today showing the Revell hatch and the modified Amati deck + scratch built hatch.


Thanks again everyone for all of your input.  I appreciate your advice and questions, so don't hesitate to let me know your comments and questions!

Cheers,

Bill


« Last Edit: 21 Apr , 2018, 07:12 by Mr. Bill »

Offline billp51d

  • Lt Cdr
  • *
  • Posts: 194
  • Gender: Male
Re: U-45 WIP
« Reply #97 on: 21 Mar , 2010, 07:13 »
    Mr. Bill...Attractive work! If you hadn't mentioned the dremel, I would have bet you had used a milling machine (Bridgeport). It sure was handy when i worked in a machine shop.
                Looking at your work, though, it does stir an old question in my mind? Ever since I started "U-BOATS" I've wondered just what kept these ammo container hatches locked/closed ? No visible latches, handwheels or mechanisms? There now...Ive finally asked...I feel better... Anybody have an answer.....Anybody???  
                              Thanks in advance
                                               Bill in Delaware..
« Last Edit: 21 Mar , 2010, 21:12 by billp51d »

Offline Mr. Bill

  • Commander
  • *
  • Posts: 274
Re: U-45 WIP
« Reply #98 on: 21 Mar , 2010, 09:29 »
Hello Bill,

Thanks for your comments!  You ask a great question - I don't know how those watertight container lids were secured.  Looking at the photo of U-47, there might be some bolts at each of the four flanges, the photo is not that clear so I can't be sure, but I doubt these actually secured the lid as the time to unbolt the lid would be far too long under combat conditions!

This photo of U-570 shows the aft container with the lid removed.  It appears there is some type of locking ring on the inside of the container - maybe this was used to secure the lid?


Probably someone out there that has the correct answer.

Cheers,

Bill
« Last Edit: 21 Apr , 2018, 07:19 by Mr. Bill »

Offline billp51d

  • Lt Cdr
  • *
  • Posts: 194
  • Gender: Male
Re: U-45 WIP
« Reply #99 on: 21 Mar , 2010, 10:02 »
         I agree, Bill.. I doubt they would have time to loosen hardware, or even fool with a handwheel if it were there. My guess, some kind of "quick release" located closely? Anybody else?....Anybody?   :-\
         Looking forward to more of your build, Bill...

Offline Greif

  • Admiral2
  • *
  • Posts: 755
  • Gender: Male
Re: U-45 WIP
« Reply #100 on: 21 Mar , 2010, 11:26 »
Very nice work on the hatch Bill!

Ernest

Offline dougie47

  • Administrator
  • *
  • Posts: 758
Re: U-45 WIP
« Reply #101 on: 21 Mar , 2010, 15:09 »
Hi Bill,

Great work on the deck hatch. You are correct that the eraly Bs had a different hatch. The one you have made on your model is ideal for an early B.

I've checked photos of U 46 and U 47. Even after they had the 20mm moved to the tower, they were not fitted with an ammo hatch behind the tower. Instead they had what looks like a simple circular blanking plate where the 20mm used to be. There looks like 6 bolt heads around the edge of the blanking plate.

Later VIIBs such as U 73, U 83, U 87, U 100 and U 101 all had the ammo hatch.

Good luck with the Amati deck, I remember it was quite thick brass.

Cheers,

Dougie

bracco_n

  • Guest
Re: U-45 WIP
« Reply #102 on: 21 Mar , 2010, 16:58 »
lovely work Mr Bill, keep it up!

Offline Pat

  • Captain
  • *
  • Posts: 395
Re: U-45 WIP
« Reply #103 on: 21 Mar , 2010, 22:42 »
I think billp is correct, that there must have been some sort of hatch release somewhere, but perhaps not right on the hatch itself.  Boatbuilders seem to be adept at finding all sorts of ways to hide things or inset them into the structure, so I'd guess perhaps either a hole somewhere in the decking that crew could reach in to release the hatch, or perhaps it was even something in between the drainage slots on the deck.

Another thought about it though.  The canisters for the ready ammunition for the FlaK guns do seem to have been closed by turning a handle on top.  They seem to be almost the same mechanism as the ones that held the inflatable dinghies, just smaller.

I wonder why they didn't use the same thing for the 88mm ammo?

Offline Mr. Bill

  • Commander
  • *
  • Posts: 274
Re: U-45 WIP
« Reply #104 on: 21 Mar , 2010, 23:05 »
Hello Pat,

I think you and Bill are correct.  It seems that some sort of quick release mechanism under the deck structure was likely involved.  Perhaps a long "T" shaped rod tool that could be inserted through the deck to turn a hex nut that released the lid.  At least this would provide fast access to the ready use ammo.  It seems that something fast acting would be necessary to get to the ammo quickly..

Cheers,

Bill
« Last Edit: 21 Mar , 2010, 23:24 by Mr. Bill »