Author Topic: 1/72 Revell Type VIIC/41  (Read 41124 times)

0 Members and 1 Guest are viewing this topic.

Offline SG

  • Admiral
  • *
  • Posts: 660
    • https://3xblackcats.wordpress.com/
Re: 1/72 Revell Type VIIC/41
« Reply #120 on: 28 Feb , 2016, 04:45 »
Clever and effective! Well done!!!

Offline tore

  • Tore
  • *
  • Posts: 2,539
  • Gender: Male
Re: 1/72 Revell Type VIIC/41
« Reply #121 on: 28 Feb , 2016, 05:56 »
Excellent soldering.'
I assume you have decided to go for U-764 as you have selected an early execution ( 1944) of the schnorchel arrangement. As U764 got the Schnorchel installation March 1944 as one of the earlier U boats, I guess the early schnorchel arrangement would be appropriate. Your "blueprint" shows the arrangement but one detail, what the Germans called the "Bewasserungsventil". Contrarily to the later execution of the schnorchel system, the first arrangement was a bit more complicated as the air duct and rubberpacking at the towerflange needed what the German called "bewasserung". Which means to prevent damage, the system required before the mast was lowered, to flood the airduct (220mm diam.) from the ventilation foot valvecasing to the top air floatvalve. Hence a "bewasserungsventil" ,or may be floodvalve, was introduced right before the ventilation intakevalve in the tower allowing the airpipe up to the schnorchelmast floatvalve to be flooded. the valve could be operated from the controlroom. Unfortunately I have no drawing of this valve but you got an idea when you look at my image below.
Tore
« Last Edit: 28 Feb , 2016, 06:03 by tore »

Offline TristanR

  • Lieutenant (jg)
  • *
  • Posts: 62
Re: 1/72 Revell Type VIIC/41
« Reply #122 on: 09 Mar , 2016, 23:16 »

CHeers Tore! I see what you mean with the diagram, I will try and get it in.
So, These lap-weldy things.  I added some strips of plastic to make these, they make a nice detail.
I am seeing a lot of scrape marks from my overdone oil canning.


It's only obvious with a glancing light, like here.


All these scrape marks are going to have to go.  I think the rivet's are oversized, but add a lot of dimension, I can't quite face scraping them off.


Meanwhile I have been doing the 3D printing thing.
You should be able to make out the 6 small magnets that will hold the conning structure on, and the deck together. If all goes to plan I should be able to remove the deck if I want to show this stuff.


The other set here contains the exterior details, not all of these are shapeways. The white prints are from another printer.
Getting a collection of hatches now.


On the left is the kit part, many ways to dress this up with PE kits and so on,  I think it's too short.
Next to that is a primed shapeways print, next to that is the taller version, unpainted.  And the one on the right is a white resin in place of the frosted stuff.


Cheers!

Offline tore

  • Tore
  • *
  • Posts: 2,539
  • Gender: Male
Re: 1/72 Revell Type VIIC/41
« Reply #123 on: 10 Mar , 2016, 00:46 »
Very nice.
As usual I have a few remarks. As to the rivets and canning I refer to my previous statement. Lifting/removing the casingdeck is a new and interesting detail but require a bit of research as to the U-764 execution. One thing is certain, the towercasing has an important headertank for the fuelcompensating. On my image below I have indicated the tank drawn in detail by Simon Morris. The compensating watertank is usually ignored as you don`t see many images of same.
 The exhaust outlets are designed in at least 5 different executions , the one shown on the museums U-995 is not relevant for that uboat as U 995 had the submerged execution, see images. In the exhaustsystem usually the VIIC had a sparkarrestor at the end prior to casing side. As the area is pretty cramped this sparkarrestor was eliminated in the last years and the exhaust was emitted below the watersurface and the outlet was as shown on my image the original U 995. I don`t know the execution on the U 764.
Tore

Offline TristanR

  • Lieutenant (jg)
  • *
  • Posts: 62
Re: 1/72 Revell Type VIIC/41
« Reply #124 on: 20 Mar , 2016, 14:51 »
Thanks, Tore, Your remarks are always welcome! 
I don't think I will have the wintergarten decking removable, so the header tank will not be seen, nice to know it's there though.
I see the spark arrestor is a kind of trough cut into the hull, is that on both sides do you know? 


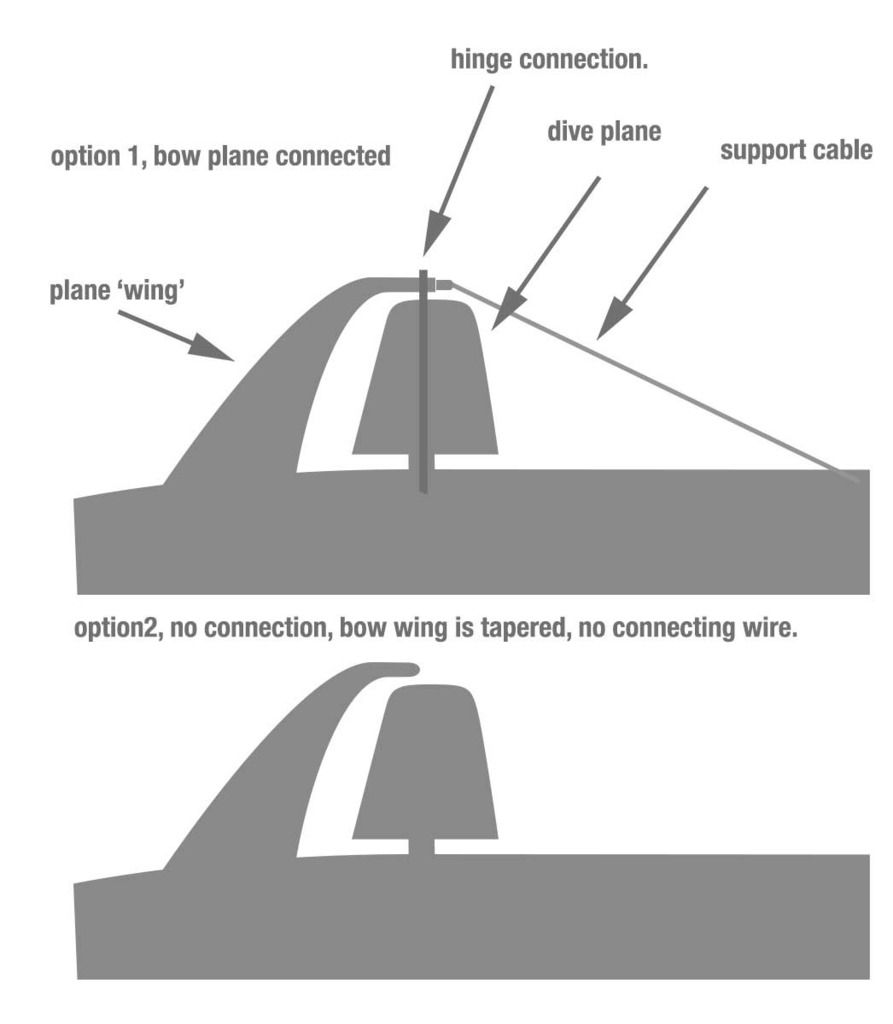
I also have a question about dive planes.
below are the two options that I think I have seen around the net, the top one is reflected in the kit, but I've seen evidence that the bottom option where the planes are not connected at the tip to the wing might also be correct.
My preference is the kit version, but I've been putting off installing the dive planes because of this confusion!
Offline NZSnowman

  • Admiral4
  • *
  • Posts: 2,419
  • Gender: Male
  • U-1308
    • U-1308 - Wikipedia
Re: 1/72 Revell Type VIIC/41
« Reply #125 on: 20 Mar , 2016, 16:02 »
Thanks, Tore, Your remarks are always welcome! 
I don't think I will have the wintergarten decking removable, so the header tank will not be seen, nice to know it's there though.
I see the spark arrestor is a kind of trough cut into the hull, is that on both sides do you know? 


I also have a question about dive planes.
below are the two options that I think I have seen around the net, the top one is reflected in the kit, but I've seen evidence that the bottom option where the planes are not connected at the tip to the wing might also be correct.
My preference is the kit version, but I've been putting off installing the dive planes because of this confusion!


I believe the real boats had the the support cable (option 1).

Offline TristanR

  • Lieutenant (jg)
  • *
  • Posts: 62
Re: 1/72 Revell Type VIIC/41
« Reply #126 on: 21 Mar , 2016, 00:17 »

Thanks SG, that's settled then, I'll run cable and keep the hinge.

Meanwhile I started using the Archer rivets set.  I really agonised whether to remove all the rivets as they seem out of scale, but they help really sell the construction of a metal boat, so I'll keep em.

First I had to attach the PE fore plate.  I soldered some railing eyelets that I spotted in some reference.  I had better do it now, rather than risk melting the hull trying to solder them on after.


I'm not exacly clear on just how the rivets are laid out, so I'm going to employ some license.


I am very pleased to have these bow pieces in the rivet kit, I shudder to imagine trying to do these with a straight row and some microsol.


I am doing this piece first and then the edges, then fill in the middle.


With the top edge.


All done, it might not be accurate, but I am happy with the results.  You can clearly see the strips of film the rivets are attached too, I'm hoping they won't come out under paint.


Finally I have been texturing the pressure hull.  I am going for the effect of a pitted surface, so I have to sand back the textureing done with a small burr.
I want to make a clear difference in the pressure hull material, from the oil canned plated parts. 
Also I have scribed a channel between the saddle tanks and the top plating, I see this gap in a lot of pictures, I like how it suggests the pressure hull continues under the plating.


Offline tore

  • Tore
  • *
  • Posts: 2,539
  • Gender: Male
Re: 1/72 Revell Type VIIC/41
« Reply #127 on: 21 Mar , 2016, 01:13 »
Hydroplanes.
The forward hydroplanes have no connection to the outer part of the hydroplaneguards. On many drawings it looks indeed as if there is a throughgoing shaft ending up in the hydroplane guard, however the hydroplane shaft end up in a fixing point about half way into the hydroplane, I guess you`ll find a bolted accesshatch at the fixingpoint.
The aft hydroplanes are slightly different although the shaft and fixingpoint are the same there is a small connection to the guard at the outerpoint. As far as I remember it is not a support shaft and bearing at the point rather a small bar shutting the gap to prevent ropes or other objects to enter the propellerarea.
The jumping wire on the fwd hydroplane guard was removed sometimes I guess at the time when the netcutters were removed. This reminds me of an event we had near Scapa Flow when we anchored waiting for orders over the night. In the morning raising the anchor we experienced the anchorcable was stuck between the forward hydroplaneguard and the hydroplane. We had to free dive  in the cold November sea (wearing longjohns) to release the cable.
By the way I guess you have noticed that the Revell kit has placed the anchorbay in the casing somewhat aft of the real place. As it is on the Revell kit the anchor would hit the fwd hydroplane when lowered. You`ll find the correct position on the GA drawings.
Tore

Offline tore

  • Tore
  • *
  • Posts: 2,539
  • Gender: Male
Re: 1/72 Revell Type VIIC/41
« Reply #128 on: 21 Mar , 2016, 03:20 »
Further to my previous images of the aft Hydroplane guards I post a detail photo of the arrangement as your see quite straight forward and not intended to take up any significant forces. 

Offline Rokket

  • Administrator
  • *
  • Posts: 2,362
  • Gender: Male
  • Submarine Enthusiast
    • AMP - Accurate Model Parts
Re: 1/72 Revell Type VIIC/41
« Reply #129 on: 26 Mar , 2016, 21:27 »
Most excellent work - beautiful detail and craftsmanship.
AMP - Accurate Model Parts - http://amp.rokket.biz

Offline GlennCauley

  • Admiral
  • *
  • Posts: 646
    • Models by Glenn Cauley
Re: 1/72 Revell Type VIIC/41
« Reply #130 on: 30 Mar , 2016, 11:22 »
Meanwhile I started using the Archer rivets set.  I really agonised whether to remove all the rivets as they seem out of scale, but they help really sell the construction of a metal boat, so I'll keep em. I am very pleased to have these bow pieces in the rivet kit, I shudder to imagine trying to do these with a straight row and some microsol.

Glad that found it useful!   :D
Glenn Cauley
President, IPMS Ottawa
gc-scalemodels.ca

Offline TristanR

  • Lieutenant (jg)
  • *
  • Posts: 62
Re: 1/72 Revell Type VIIC/41
« Reply #131 on: 07 Apr , 2016, 00:16 »
Hi Glenn, thanks for putting that together with Archer's, very useful indeed!
[/size]Thank you Rokket, it's getting there bit by bit!

Tore, It's amazing that you served on one of these boats, I really appreciate your input on this boat here. Regarding hydroplanes, I decided to remove the hinge, and add the jumping wire, it adds a nice bit of interest.  I did know about the anchor bay, and though about moving it forward, but I was keen to stick the hulls together so I left it... 


In order to connect to the hull, I soldered a 1/4 inch lentch of 0.5mm rod to an eyelet spare from the Eduard set (I hope it was a spare).  I drilled a hole in the hull and I can inset the rod so the eyelet is right next to the hull.  I am using EZline for the jumping cable.  Seems thin. I used a small loop of wire glued into a tiny, thin walled aluminum tube from albion alloys.  I also threaded the EZline through the pipe and glued that too.  Ezline is very stretchy.


Underneath, I haven't glued the fin-guards in yet, but there will be a big gap to fill when I do.


[/size]I sanded most of these GHC plates off, so I'm using a 1.4mm punch to stick the missing ones back on.


Also, I got my front panel to fit.  I guess I did a horrible job measuring the kit's conning tower here, because I had to remove a lot of material to get it to fit.  I sort of made up the detail based on a picture of U-249 after it surrendered.


Paint.
At some point it's going to be possible to actually paint this model...  Ages ago I bought two Kreigsmarine lifecolor paint sets, one for warships, and one for submarines.  Lots of Greys.  I dug out some Tamiya paint for comparison.


[/size]

This is a horrible photo, but Dunkelgrau, is indistinguishable from german grey, to my eye, I put a tiny square of it in the top edge of the lifecolor dunkelgraus on the top row.
XF-20 medium grey is way warmer than I thought in comparison. Schiffsbodenfarbe is a very deep green.

I think I will add some blue to German grey for the hull, and they use the darker of the two hellgraus as the topdeck, perhaps mixed with a warmer tone like the medium grey to balance out the colder tones on the hull. We shall see soon I hope.  I have some riveting amidships to attend to, but the hull is close to primer.


[/size]
[/size]

Offline TristanR

  • Lieutenant (jg)
  • *
  • Posts: 62
Re: 1/72 Revell Type VIIC/41
« Reply #132 on: 07 Apr , 2016, 00:40 »

Got some more 3D printing in, hope it fits well, because this stuff is getting expensive.


Test fit of the exhaust system, those 2 bars in between are just to hold the exhausts together until glued.


A test fit of the conning tower parts.


Torpedo loading hatch, I have the easing spring perpendicular to the loading pipe, the hatch opens when pinned and sits on an 10mm evergreen tube.


Also in the set are some bottle ends, snip the apart and fit some evergreen tube in between them.

[/size]
[/size]The exhaust exit port is going to include these perforated metal pipes I found, just for fun, and because I like it better than an empty hole.


It's a 3 part system, where I can swivel things around to get it all to fit.


I began more rivets!  I regret sanding all these rivets off here.  I'm tediously adding them all back on, being careful to add the rivets in line with the support struts. 


Before I can stick the conning tower together I should paint these wooden parts up, it'll be a lot harder after it's together.  Plus I need to start painting something!


I started mixing up an orange from flat red and yellow, going for a teaky look.


The colour image on the back of this book is my guide. I am washing the orange back with some flat brown,


Finally I add some black oil paint over the top and wipe it back to match the reference.  I will mask these now and glue these parts together.


Offline Rokket

  • Administrator
  • *
  • Posts: 2,362
  • Gender: Male
  • Submarine Enthusiast
    • AMP - Accurate Model Parts
Re: 1/72 Revell Type VIIC/41
« Reply #133 on: 20 Apr , 2016, 02:28 »
Really nice wood effect!
AMP - Accurate Model Parts - http://amp.rokket.biz

Offline TristanR

  • Lieutenant (jg)
  • *
  • Posts: 62
Re: 1/72 Revell Type VIIC/41
« Reply #134 on: 20 Apr , 2016, 03:16 »
Thankyou Rokket!
Primer!


Some issues, I guess I didn't micro sol enough, this rivet carrier film wasn't stuck down, but I couldn't see it when it was transparent.  Now with paint it has become a weathering opportunity maybe.


Also my rear stern deck was glue wrong, with a air bubble like gap.  Debonder needed.


Ugh it's a bit rough round here, my brasswork is a bit battered looking...


Front is nice though. Now it's painted I can see the difference in the rivets. The archer rivits are lees raised than the kit.


It's a bummer that the corners of the doors stick out.  I do have another set of doors, maybe it's ok.


On with the rust base. 


Couldn't resist getting some rust going.


I'm going to mask the cast pressure hull parts off and chip them first.
If chipping goes wrong her I'll just have the pressure hull not be chipped.
That way I can chip the forward and aft sections one at a time.


The hull colour is Tamiya medium blue with a bit of flat blue to boost it.  It looks way to light now, but when I did a Chieftain Tank recently, it got a lot darker once the weathering began.

Had some rivet casualties on the brass, oh well. Another weathering opportunity presents itself.


Here's how I'm breaking up the chipping jobs, The first quarters first.

This is probably way overboard, but that's what the chipping gods gave me.
Better do the other side before the conditions chance.