Author Topic: Enigma's 1/144 VII-C  (Read 5374 times)

0 Members and 1 Guest are viewing this topic.

Enigma

  • Guest
Enigma's 1/144 VII-C
« on: 01 Mar , 2011, 22:19 »
After a year and a half of lurking beneath the waves of this board, I figure it's about time to surface the boat, don the oil gear and open the hatch! My interest (obsession?) with u-boats came swiftly after reading a few reviews of SH3, I was unemployed and searching for a good simulation game that would keep me busy for a little while. Needless to say, I'm still busy! The variety of tasks found aboard these beauts really surprised me, it was if I'd found my holy grail mixture of rugged intuitive methods with high-tech tools. Being a very curious person I started researching, both to become more familiar with different components for interest's sake, but also to hone my skills in the sim. Before long I found myself literally surrounded with papers and the tools of the navigator, my 7.1 surround sound headset made the hydrophone station a dream.

Being in love with the lines of several boats, I figured I should make one. The all-too-familiar modeler's debate arose as to what type and which specific u-boat would be created. On top of that, I'm young and the purse-strings are tight so those have to be worked with. Despite not being a prolific modeler by any means, I have an odd collection of skills and knowledge that seem to allow me to tackle projects much larger than suggested and they turn out rather well. Ultimately I want to make a 1/72 scale VII-C (probably my favourite looking rig) and would love to scratch build a IXC/40, specifically U-889 as she surrendered in my hometown of Shelburne, Nova Scotia, and would love to see it added to our museum collection.

Up until now I've only had visions in my head and many sketches on paper of how I wanted to proceed. Working in the shipbuilding museum at home for two summers allowed me to learn the ins and outs of wooden shipbuilding, particularly schooners. I think this has something to do with the obsession - take a VII, give it a few extra feet of freeboard and lighten up the tumblehome and you've got yourself a schooner hull! That being said, the scratch built U-889 will probably be built just like the real thing. Good thing I'm young!

I happened to stroll into a hobby shop over the weekend and much to my delight found the Revell 1/144 Type VII-C kit (05038) and gave it a new home. All I've done with it so far is look at everything and drool! ;D I figure this build will tide me over until the stars align to make the larger projects feasible, so while this little sucker comes together I'll do the usual progress thread.

And with that, I'm off to the head!

Offline NZSnowman

  • Admiral4
  • *
  • Posts: 2,419
  • Gender: Male
  • U-1308
    • U-1308 - Wikipedia
Re: Enigma's 1/144 VII-C
« Reply #1 on: 01 Mar , 2011, 23:31 »
Welcome aboard Enigma! Look forward to see the boats.

Offline FoxbaT

  • Lt Cdr
  • *
  • Posts: 199
Re: Enigma's 1/144 VII-C
« Reply #2 on: 02 Mar , 2011, 03:32 »
Welcome  ;)


Karel

Offline Rokket

  • Administrator
  • *
  • Posts: 2,362
  • Gender: Male
  • Submarine Enthusiast
    • AMP - Accurate Model Parts
Re: Enigma's 1/144 VII-C
« Reply #3 on: 03 Mar , 2011, 04:18 »
Welcome! Nice intro, and a great way to start.

You must take risks and try things and post info and pix as you go! You already have instant fans.
AMP - Accurate Model Parts - http://amp.rokket.biz

Enigma

  • Guest
Re: Enigma's 1/144 VII-C
« Reply #4 on: 03 Mar , 2011, 21:32 »
Thanks for the warm welcome guys! I suppose I should add some things I seem to have left out. First off, I'm no longer unemployed, I'm back at university, meaning less modeling time :( Modeling will probably be on the weekends for me, with any research done through the week, so expect an update this weekend. I've decided upon making U-69 as I enjoy the look of netcutters, the breakwaters and the wind deflector together, as I got used to this type of outfit from starting off so many patrols at the outbreak of was in SH3. Sure, there are others that may have had this configuration, but the Laughing Cow really takes me - such a funny (dare I say cheesy?) insignia for such a deadly looking boat. From what I've seen it's also one of the few (only?) that look like an actual painting rather than a stencil or screen print. It's a nice bonus that the timeframe I'll be looking at lends a nice tonnage count to U-69! The other major deciding factor is that being one of the more popular choices I can cut down the time needed to research on my own, instead doing more revision of previously compiled research.

One thing I'm interested to see is where my skills start off at - I suspect that my other skills in life have passively increased my modeling skill set. I'm constantly fixing and tweaking things with precision screwdrivers, working with tiny measurements and making things 'look right'. My old shipbuilder boss showed me a neat trick that he said that all draftsman had in their toolkit around the shipyards in my neck of the woods. We were taking the lifts off a half-hull model of a schooner and we were faced with having to draw what would technically be known as a NURBS curve. I was used to working with these in AutoCAD and also had access to the weights used for laying out real splines on the floor as they did in the old days, but I wasn't sure how Bill was going to work a nice spline on the paper in such a small space. He pointed out for me to watch closely as he did this trick (I was filming the whole process of taking the lines from the model for part of my job). He took the pencil and eyeballed it! Considering that every pencil mark made up until that point had been laid out with various pieces of drafting equipment I had to laugh at Bill's 'trick'.

I guess I can only chatter for so long. My weekend starts in ... 14 hours from now, so I'll probably start opening up some of the drainage holes as soon as the clock hits 15.30! Until then, I'm off!

Offline Rokket

  • Administrator
  • *
  • Posts: 2,362
  • Gender: Male
  • Submarine Enthusiast
    • AMP - Accurate Model Parts
Re: Enigma's 1/144 VII-C
« Reply #5 on: 04 Mar , 2011, 01:04 »
Interesting "trick" you describe - it kinda slaps you! I remember a quote form somebody somewhere, life or movies, "He's a better shot [?} than hen he's drunk" and wise old folks saying "I've forgotten more than you'll ever know".

U-69 is a fine choice. I am always interested in the subjects people choose, and why, It's half the battle!

We are standing by for progress reports and pix!
AMP - Accurate Model Parts - http://amp.rokket.biz

Enigma

  • Guest
Re: Enigma's 1/144 VII-C
« Reply #6 on: 04 Mar , 2011, 05:46 »
Jawohl Herr Kaleun!


The components themselves. The hull pieces fit very nicely right off the bat!


View of some of the smaller components, ruler and a 6 foot man in scale for reference.
« Last Edit: 04 Mar , 2011, 06:59 by Enigma »

Offline Pat

  • Captain
  • *
  • Posts: 395
Re: Enigma's 1/144 VII-C
« Reply #7 on: 06 Mar , 2011, 19:36 »
Welcome Enigma.

That's an interesting idea you have, to have a scale drawing of a human handy to compare all the parts to as you're building.  I can't say exactly why, but I like it.

Enigma

  • Guest
Re: Enigma's 1/144 VII-C
« Reply #8 on: 07 Mar , 2011, 21:47 »
Welcome Enigma.

That's an interesting idea you have, to have a scale drawing of a human handy to compare all the parts to as you're building.  I can't say exactly why, but I like it.

Glad you like that idea, unfortunately he was just a recruit and has now begun training. Actually it was just a quick drawing with a dry-erase marker as I'm adding my progress reports as (pun alert) sub-section of my blog; it'll give a decent reference for scale for those heathens non-modelers out there who don't know what 1/144th is like, let alone the full sized beast.

[Edit - is there a specific command on this board to have a smaller thumbnail for the images? I've used enough messageboards that I can't keep track of each one's quirks! I linked these pics from my blog, the probable source of any issues, so I'll likely end up figuring it out later this week.


Here you see that I've opened up the drainage holes in the bow, I wouldn't be able to live with myself if I just left them as dents in the plastic and painted them black like the kit wants you to. U-69 didn't have the last 3 holes that are added on the model part, so I'm preparing to fill them up so later they won't really be there. I'm using a trick I picked up from earlier model work - baking soda and superglue make a really tough, really fine gap filler. I filled the holes up with baking soda, pressed it in a bit, and then added a drop of glue to each hole. As you can see, the filler dries up semi-clear and it'll sand very well.


Here's a shot of the bow, you can see I added the breakwater here. The edge of the join is still fairly fat, it was pretty near impossible to sand it thinner without breaking it, so I'll smooth it out later with some cosmetic surgery.


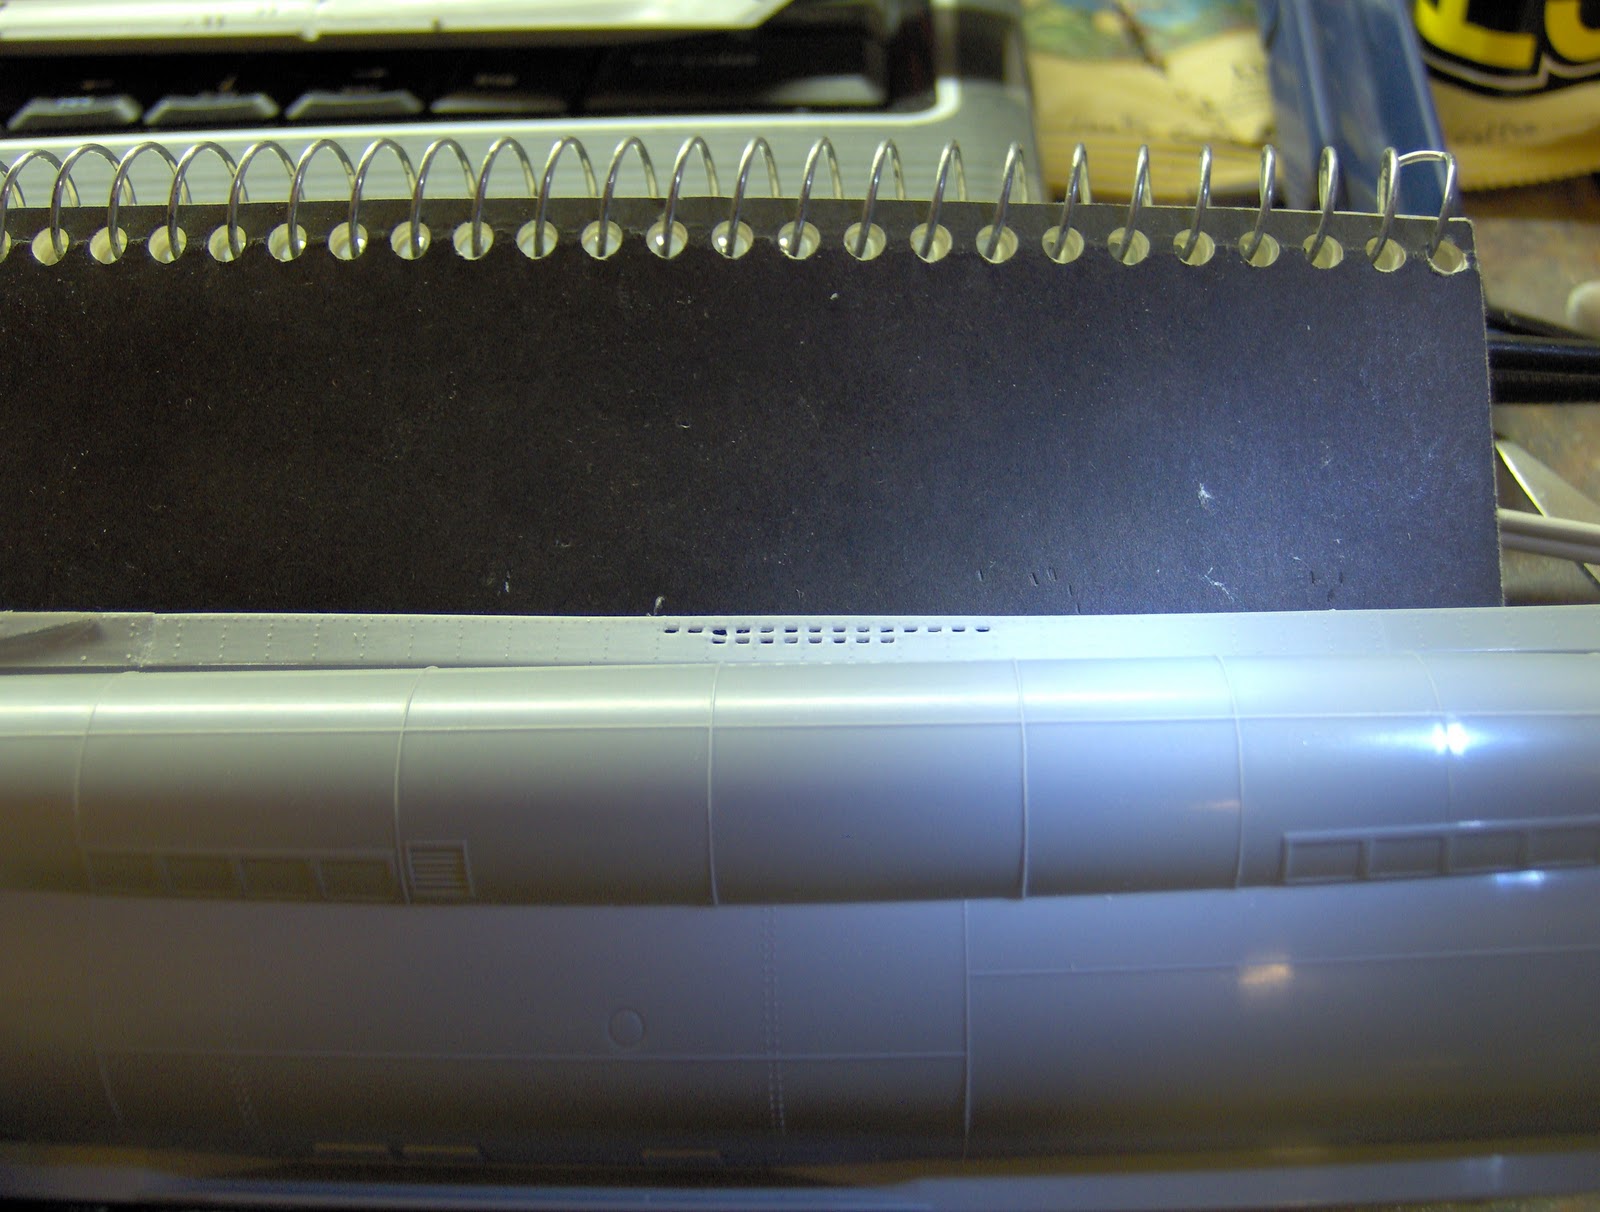
Some more small flooding holes. I used a 1mm flathead micro-screwdriver with the head filed down to a chisel to punch these out. This is the worse of the two sides, the picture was better though!


I'll be punching out the flooding holes in the stern as well; I've found that my mini chisel is small and accurate enough that it can work around nearly anything so there's no need to do all the hull modifications in one step at the beginning. I just pad the inside surface of the hole, having most of the support for the part coming from this, and have the rest of the part propped up enough to avoid any shaking. If the plastic is thin I can punch it with the chisel with finger strength, otherwise I'll use a small hammer to give it a gentle tap.

I've decided to not bother with aftermarket parts for this model, sadly the costs of acquiring them and the shipping don't scale very well. The parts that look plain bad with the model (the flak gun being a bumpy, limp 0.57mm piece of plastic) will end up being replaced with scratch-built parts. Who says I can't turn my Dremel into a lathe! The decking will require some more thought, but I think I have a plan already; I'll double check some measurements this week and let you know if it'll fly! ;)

I also started a new round game of Silent Hunter 3. I've set up in the 7th flotilla and will be getting a VII-C as soon as they come out, U-69 of course! So far I'm on my first wartime patrol, headed through the Kiel canal and westward I went until off the shores of England. Sank a medium cargo ship there and another off Aberdeen. It's pretty neat to be building a scale model AND playing with the virtual equivalent in what's probably the closest thing to commanding the original! As luck would have it, my first torpedo was a dud - it hit completely perpendicular to the hull but no boom-boom. That's what you get for playing at 100% realism...
« Last Edit: 07 Mar , 2011, 21:54 by Enigma »

Offline Pat

  • Captain
  • *
  • Posts: 395
Re: Enigma's 1/144 VII-C
« Reply #9 on: 08 Mar , 2011, 05:56 »
Enigma, while your home-made screwdriver/chisel is agreat tool, I strongly reccommend you get a set of micro drill bits from your local hobby store.  They're available in sizes down to 0.08 inches, which isn't any thicker than a cat's whisker.

These bits have several advantages to the chisel.

They make identical holes, every time, all perfectly round.

They make holes without any pressure, so you can drill small holes close together without breaking the plastic.  (I drilled out all the holes for the vents at the side of the CT on my U-boat and I can't tell that it's not an aftermarket PE plate)

They make tiny, tiny holes.  0.08" is really small.

They drill through plastic very quickly and will even go through brass and aluminum so you can scratchbuild

They come in about 40 sizes, the biggest one being about the size of the smallest bit you can get at a hardware store.

To make a square hole, drill it out to the largest you can with these drills and then square up the corners with a pointed blade.  Again, makes it very neat.

Your idea with the baking soda and CA is a good one.  Some hobby shops already carry CA with different percentages of (I think) baking soda in them but probably you're putting in more soda than the commercial ones because you're using it for a different purpose than gluing..  The idea is that the baking soda makes the CA thicker (as you're using it) and it also makes it dry slower, so you have a short time to reposition a part if necessary.

But like you, I often get the straight CA and thicken myself depending on the requirements.

Yep, a Dremel makes an excellent lathe, and for larger stock (I've made a lot of sailing ship models so turn the masts myself) a regular drill with a notched block at the far end to support the tailstock so it doesn't wobble.


Enigma

  • Guest
Re: Enigma's 1/144 VII-C
« Reply #10 on: 08 Mar , 2011, 16:07 »
I'll look into your suggestion for sure. Is it 0.08" or 0.008"? I whipped out the micrometer and 0.08" == 2mm, whereas my smallest bit is 1/16th" (1.61mm). I'm slowly adding to my toolkit as I progress through life, since I'm currently still in school I'm essentially hemorrhaging money so I'll save the next toolkit upgrade for a birthday or some other occasion where it's expected that I throw money at something I want.

I suppose that, yet again, I wrote before I thought. What I'm really doing is thinning the inside of the pieces using the dremel until I'm at the level where the kit's 'holes' stop, THEN I'm using the microchisel to remove any bits hanging around the perimeter of the holes if they haven't come off already. Works really well for the main floodholes and to the level I'd like with the tiny ones above the saddle tank. The third hole in that group from the left has indeed been borked, though I know exactly why... as I was cleaning out that hole it was dead silent in the apartment, then one of my roommates created a sound so loud and sudden that I jumped, hence the bent plastic. I won't tell you the source of the sound, but I will tell you that tools had to be put down until the communal laughing fit died down. Ahh, the hazards of precision work around others... maybe I should have had some hearing protection on? ;D

Offline Rokket

  • Administrator
  • *
  • Posts: 2,362
  • Gender: Male
  • Submarine Enthusiast
    • AMP - Accurate Model Parts
Re: Enigma's 1/144 VII-C
« Reply #11 on: 13 Mar , 2011, 18:24 »
Dremel thinning is TOPS, the best method. You can get it wafer thin and translucent, and then a trusty #11 blade will do the rest. I thinned the bottoms to give the illusion  of scale-thin steel:


This will all be a bit tricky and might have to be truncated in 1:144, but looking good so far!
AMP - Accurate Model Parts - http://amp.rokket.biz

Offline Pat

  • Captain
  • *
  • Posts: 395
Re: Enigma's 1/144 VII-C
« Reply #12 on: 14 Mar , 2011, 06:34 »
You caught me.  It must 0.008" because it's a lot less than 2mm.  The smallest ones are almost as thin as a hair and can drop through the eye of the smallest needles.  I haven't seen my micrometer for a while so it was just a guess.

They're not expensive.  Around here, you can buy them individually for about $1 CDN each or a graduated set for around $12-15.  You need a pin vise to use them (sort of precision screwdriver with a tiny drill chuck at the end) but they're about $6, so it's not a big expenditure.

The one thing is with drill bits that tiny, they are easy to break the smallest ones.

Offline Rokket

  • Administrator
  • *
  • Posts: 2,362
  • Gender: Male
  • Submarine Enthusiast
    • AMP - Accurate Model Parts
Re: Enigma's 1/144 VII-C
« Reply #13 on: 15 Mar , 2011, 02:35 »
"Easy to break" - that's luxury! I WISH they were easy to break! For me, these fragile hair-bits are so intensely easy to break, they are beyond easy! "easy" would be something I could live with! ;D


AMP - Accurate Model Parts - http://amp.rokket.biz

Offline Pat

  • Captain
  • *
  • Posts: 395
Re: Enigma's 1/144 VII-C
« Reply #14 on: 18 Mar , 2011, 21:05 »
Ok.  Perhaps "easy to break" is a bit of an understatement.

But it can be done.

I once drilled around 160 holes to create the grill of a Bedford truck in an SAS diorama I was making for a hobby shop.  Using the very smallest bit, I only went through about 8 bits to drill all the holes.  the first few I broke after only about 5 of 6 holes but then I got into a method and sometimes managed over 40 holes before a break.

IIRC, I had to hold both parts in my hands, and have my hands braced against each other so that if they twitched, both twitched at the same time.  Using a vise or other holder didn't work because if your drilling hand twitched, the stock piece stayed still.

The other part of the technique was not to put any pressure on the bit at all, just let it pull itself through with its own spiral.  Any pressure to make it go faster was fatal.

You do have to have lots of patience.

And once I'd drilled the first few holes, I was sort of stuck doing all of them because it wouldn't have looked right.

Using this technique, I often drill out the barrels of guns in 1:72 scale, and of course with the exception of the 20mm, all the holes on a U-boat are fairly large so you don't have to use the tiny bits.