Author Topic: U-45 WIP - Completed October 2019  (Read 145141 times)

0 Members and 19 Guests are viewing this topic.

Offline Mr. Bill

  • Commander
  • *
  • Posts: 274
Re: U-45 WIP
« Reply #200 on: 03 Jan , 2011, 17:20 »
Hello and Happy New Year!

I just completed the life preservers for U-45 in the pre-war red finish with the flotilla and boat inscription in white.  Still need to apply a light spray of clear flat sealer.  Thanks for having a look, please let me know if you have any questions or comments.

Cheers,

Bill

« Last Edit: 23 Apr , 2018, 08:41 by Mr. Bill »

Offline Mr. Bill

  • Commander
  • *
  • Posts: 274
Re: U-45 WIP
« Reply #201 on: 03 Jan , 2011, 17:41 »
A few images of the conning tower now about 99% completed.  Decals are from the AMP Type II set.  I applied a light black wash to bring out some details, but no weathering as my build is of U-45 on commissioning day when the boat was in near pristine condition.  Still need to fabricate the attachment straps for the life preservers and then fasten them to conning tower sides.  Let me know if you have any questions.  Thanks for having a look.

Cheers,

Bill


« Last Edit: 23 Apr , 2018, 08:44 by Mr. Bill »

Offline Mr. Bill

  • Commander
  • *
  • Posts: 274
Re: U-45 WIP
« Reply #202 on: 03 Jan , 2011, 18:37 »
A few more snaps showing the inside of conning tower and a few taken with flash.  The periscope housing is dry fitted and not quite aligned correctly.  Thanks again for looking.

Cheers,

Bill


« Last Edit: 23 Apr , 2018, 08:45 by Mr. Bill »

bracco_n

  • Guest
Re: U-45 WIP
« Reply #203 on: 03 Jan , 2011, 19:49 »
Mr. Bill, I haven't been so stunned since I discovered Siara's U-552. Your boat looks awesome, almost real! The inscriptions on the life preservers are decals? Keep up this great build!

Offline FoxbaT

  • Lt Cdr
  • *
  • Posts: 199
Re: U-45 WIP
« Reply #204 on: 03 Jan , 2011, 20:23 »
Beautiful work!


Karel

Offline NZSnowman

  • Admiral4
  • *
  • Posts: 2,419
  • Gender: Male
  • U-1308
    • U-1308 - Wikipedia
Re: U-45 WIP
« Reply #205 on: 03 Jan , 2011, 20:42 »
Hi Bill

The conning tower looks great!!

Offline Mr. Bill

  • Commander
  • *
  • Posts: 274
Re: U-45 WIP
« Reply #206 on: 03 Jan , 2011, 20:49 »
Thanks for the kind words Everyone!

I made my own decals using Bel Decal Paper on my HP Inkjet printer.  This was the only way I could come up with to get acceptable results for the needed inscription.  I printed about a dozen images and used about half in getting the results you see.  They are very fragile and do not conform well to compound surfaces.  Also, I applied a very thin spray of clear sealer on the decal which resulted in several of them bleeding ink once in place which required me to start over.  This is the tricky part with the Bel Decal paper - too much sealer and the decal will look very thick once applied, too little sealer and the water may penetrate and run the ink.   A frustrating process to be sure, but I could not think of an alternative that would be easier.  After looking very carefully at the photos of U-45 I decided the inscription should read as follows:

U 45     7.U-Bootflotille     U 45

I do not know what the original font was so I matched it as best as I could, I think I used a microsoft font called "Frankenstein SF".  

Thanks again,

Bill


« Last Edit: 03 Jan , 2011, 21:23 by Mr. Bill »

Offline rabapla

  • Lt Cdr
  • *
  • Posts: 195
  • Gender: Male
Re: U-45 WIP
« Reply #207 on: 04 Jan , 2011, 02:55 »
the first picture in Your last post looks absolutely brilliant! like real life on a sunny day! perfect and impressiv...............

sincerely

ralf
Sincerely

Ralf

Offline dougie47

  • Administrator
  • *
  • Posts: 758
Re: U-45 WIP
« Reply #208 on: 04 Jan , 2011, 14:08 »
Hi Bill,

Amazing work, the lifebelts in particular are great. Thanks for using the AMP decals, they look nice on such a good model. I love the top of the UZO being lighter - little details like this really add to the authenticity.

Cheers,

Dougie

Offline Greif

  • Admiral2
  • *
  • Posts: 755
  • Gender: Male
Re: U-45 WIP
« Reply #209 on: 05 Jan , 2011, 00:01 »
Hi Bill, I agree with everyone's comments.  Breath taking work, both the modelling and the photography.  Respect!!

Ernest

Offline Mr. Bill

  • Commander
  • *
  • Posts: 274
Re: U-45 WIP
« Reply #210 on: 05 Jan , 2011, 22:12 »
Thank you everyone for your gracious comments.  The momentum on U-45 is really moving now and I finally see the end in sight!

Cheers,

Bill

Offline Pepper-mint

  • Commander
  • *
  • Posts: 343
  • Gender: Male
  • U-1299
Re: U-45 WIP
« Reply #211 on: 06 Jan , 2011, 02:58 »
Joining all the Gents Mr.B, travail tr
On the W.bench :
Books, pics, drawings, styrene, dreams and :

Offline Rokket

  • Administrator
  • *
  • Posts: 2,362
  • Gender: Male
  • Submarine Enthusiast
    • AMP - Accurate Model Parts
Re: U-45 WIP
« Reply #212 on: 07 Jan , 2011, 16:52 »
very nice turm work too!
AMP - Accurate Model Parts - http://amp.rokket.biz

Offline Mr. Bill

  • Commander
  • *
  • Posts: 274
Re: U-45 WIP
« Reply #213 on: 04 Apr , 2011, 21:31 »
Hello !

I encountered some problems with the net cutter supports and the aft cable supports, but finally managed to overcome them after several attempts.  The major issue was how to construct a support with the necessary brackets to mate with the small photo etched brackets already installed into the deck.  I tried several methods and materials, but nothing really worked properly until I thought about the technique that Siara used.  Inspired by Siara, I experimented with brass rod and aluminum tubing and found a solution.  The brass rod comprised the main support part while the aluminum tubing was used for the brackets.  Tricky part was drilling the tube and cutting the slot to mate with deck parts.  Once glued into place, the aluminum tube was squared with a file to better resemble the actual thing.

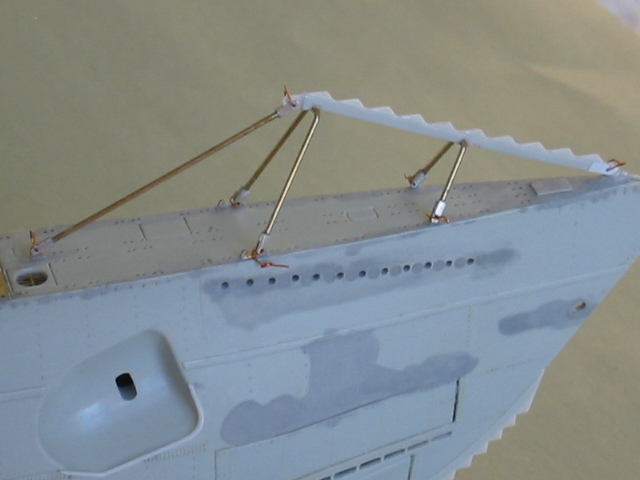
The photos show the supports dry fitted with small lengths of copper wire to hold them in place.  Stretched sprue with the ends heated to round them like bolts heads will be used for the final assembly.

The first photo shows the net cutter assembly in place.  The kit part was modified to add one additional cutting tip to the blade.  Also visible in this photo is the small modification to the edge of the anchor well.


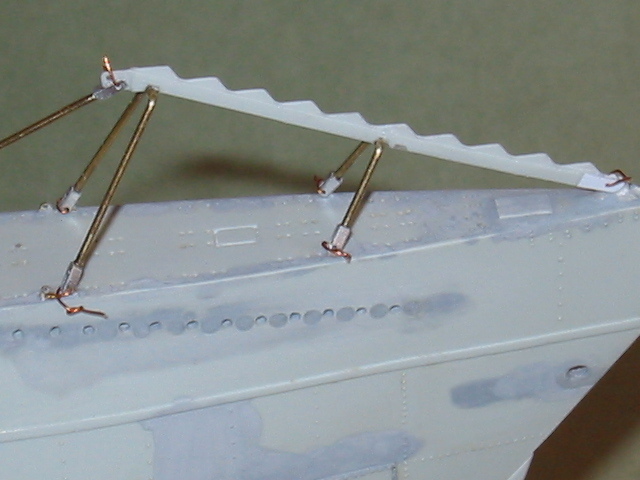
A closer view of the net cutter assembly


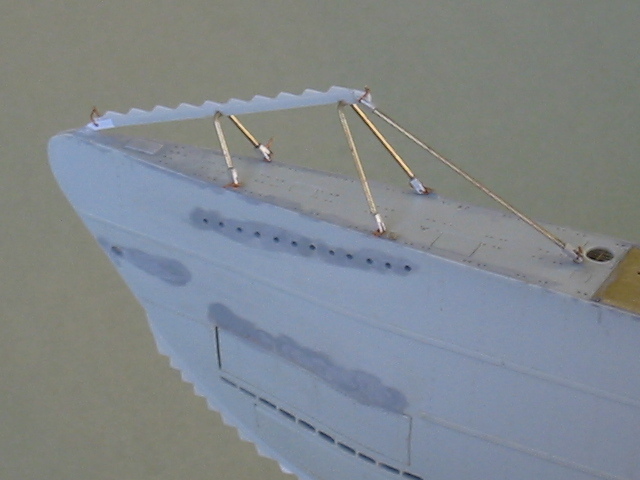
And a view from the other side.


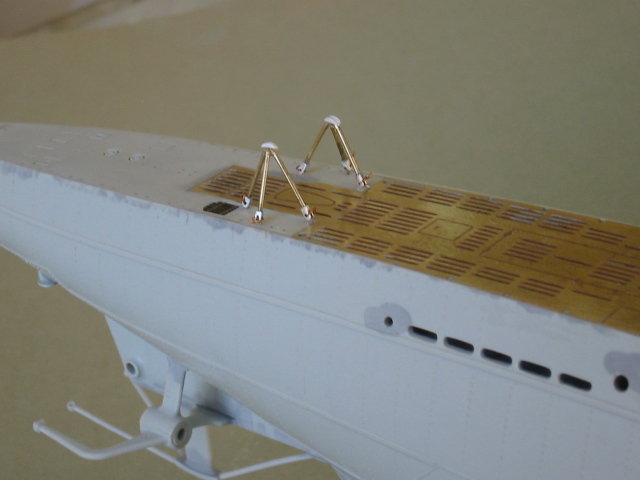
This image shows the aft cable supports, constructed in a similar manner.


Another view of the support structure.


Thanks for looking, please let me know if you have any questions.  Your comments and suggestions are always welcome.

Cheers,

Bill
« Last Edit: 23 Apr , 2018, 08:50 by Mr. Bill »

Offline Mr. Bill

  • Commander
  • *
  • Posts: 274
Re: U-45 WIP
« Reply #214 on: 04 Apr , 2011, 21:40 »
More progress photos showing the relocation of the "bumps" and installation of the bracket for the bow plane tension wire attachment.  I carefully cut the bumps from the hull with a new blade and relocated them to the proper position.  The brackets are spare PE items that I inserted into carefully cut very small slots in the hull.  They are small and a bit difficult to see in the photos


Cheers,

Bill
« Last Edit: 23 Apr , 2018, 08:51 by Mr. Bill »

Offline Mr. Bill

  • Commander
  • *
  • Posts: 274
Re: U-45 WIP
« Reply #215 on: 04 Apr , 2011, 22:09 »
A few more photos to give a general idea of where the project is at present.


This image shows the galley hatch edge made from styrene heat molded to the proper shape.


A general view of the deck with items dry fitted in place.


Forward escape buoy dry fitted.  I reworked the light to get it a bit more accurate looking.


Image of the tower temporarily bolted into place.


Closer view of the tower with white board in place.  I made some faint boot scuff marks with a pencil.


20 mm dry fitted to deck.


Another view of the 20 mm.


The 88mm deck gun dry fitted.


Thank you for having a look at the photos.  Please let me know if you have questions or comments.

Cheers,

Bill
« Last Edit: 23 Apr , 2018, 08:54 by Mr. Bill »

TRM

  • Guest
Re: U-45 WIP
« Reply #216 on: 05 Apr , 2011, 04:01 »
Everything is looking great Bill! ;D 

bracco_n

  • Guest
Re: U-45 WIP
« Reply #217 on: 07 Apr , 2011, 11:05 »
Boat looks great Mr. Bill!

Offline NZSnowman

  • Admiral4
  • *
  • Posts: 2,419
  • Gender: Male
  • U-1308
    • U-1308 - Wikipedia
Re: U-45 WIP
« Reply #218 on: 07 Apr , 2011, 13:17 »
Looking great, Bill!

Offline Rokket

  • Administrator
  • *
  • Posts: 2,362
  • Gender: Male
  • Submarine Enthusiast
    • AMP - Accurate Model Parts
Re: U-45 WIP
« Reply #219 on: 08 Apr , 2011, 03:05 »
Beautiful, beautiful brass and scratch work. the details make it sing!
AMP - Accurate Model Parts - http://amp.rokket.biz

Offline Mr. Bill

  • Commander
  • *
  • Posts: 274
Re: U-45 WIP
« Reply #220 on: 01 Dec , 2011, 08:15 »
Hello Everyone!

Where has the time gone?  Seems like just yesterday I was working on U-45, when actually it has been many, many months!  Some minor progress has been made since my last update, but not much.  I encountered a few nasty problems with U-45 that resulted in some long and frustrating delays.  Foremost among these delays was when I discovered some minor separation of the seam between the deck and hull that required careful repair and reinforcement.  I believe the problem with separation had to do with air temperature changes causing the brass deck and styrene hull to expand and contract at different rates.   It has been several months since I fixed this problem and fortunately the seams appear to be holding together very well now so I feel more confident in proceeding with the project.  The lesson here is that when utilizing large pieces of different materials (wood/styrene/brass) that have relatively long and/or large contact areas (like deck to hull), keep in mind that these materials will react differently to the surrounding environment so eliminate seam stress where possible and avoid direct sunlight and extreme temperatures.
Look for updates along with photos soon!  In the meantime, your questions, comments, and suggestions are always welcome.

Cheers,

Bill 

Offline SG

  • Admiral
  • *
  • Posts: 661
    • https://3xblackcats.wordpress.com/
Re: U-45 WIP
« Reply #221 on: 01 Dec , 2011, 09:46 »
Hey Mr Bill
Am glad you succeeded in overcoming the troubles and am looking forward to seeing the pics soon!
your U-45 is a masterpiece!
Cheers!

SG


Offline Rokket

  • Administrator
  • *
  • Posts: 2,362
  • Gender: Male
  • Submarine Enthusiast
    • AMP - Accurate Model Parts
Re: U-45 WIP
« Reply #222 on: 10 Dec , 2011, 00:12 »
She sure is a beaut!

I was worried about the same deck problem with wood to styrene for my U 557, so I made a tight press fit, then reinforced the hull at just below deck level with two cross pieces. Essentially this took all stress off the deck, and the deck just dropped in to sit on a shelf.

For the AMP Type II set, we provided folded tabs in the deck pieces, for a pressure fit and much more gluing surface area. It's a tough problem we wanted to reduce.

She does look mighty fine tho, so keep going!
AMP - Accurate Model Parts - http://amp.rokket.biz

Offline Mr. Bill

  • Commander
  • *
  • Posts: 274
Re: U-45 WIP
« Reply #223 on: 01 May , 2013, 13:43 »
Hello!

Just a quick note to say that U-45 has not been lost in action and is still very much alive.  It has been a long time, but I do plan to bring this project to a successful conclusion.  In the meantime, your continued endless patience is much appreciated!

Cheers,

Mr. Bill

Offline Rokket

  • Administrator
  • *
  • Posts: 2,362
  • Gender: Male
  • Submarine Enthusiast
    • AMP - Accurate Model Parts
Re: U-45 WIP
« Reply #224 on: 09 May , 2013, 02:17 »
We stand by...
AMP - Accurate Model Parts - http://amp.rokket.biz

Offline Mr. Bill

  • Commander
  • *
  • Posts: 274
Re: U-45 WIP
« Reply #225 on: 13 May , 2013, 14:43 »
Greetings!

Some new images of work on U-45.  These show the railings on either side of the deck mounted 20mm which were a common feature of the early VIIB's.  I scratch built these from styrene rod using photos as a guide.  The Amati brass deck has holes in the approximate correct location for most of theses railing where they meet the deck which greatly helped.  Photos from pre-war VIIB's show small benches attached to these railings which I made from sheet styrene.  Bending the styrene rod to represent the curve shown on the real thing while keeping everything aligned with the deck holes was the most difficult part of making these railings.  Next will come the stanchions used on pre-war boats shown in many photos.  I plan to make these from very small brass tube with tiny brass rings on the top and a small metal pin inserted in the bottom that will go into the deck.  More on that later, in the meantime enjoy the new images.  Your questions and comments are always welcome.


Cheers,

Bill


« Last Edit: 28 Apr , 2018, 08:31 by Mr. Bill »

Offline SG

  • Admiral
  • *
  • Posts: 661
    • https://3xblackcats.wordpress.com/
Re: U-45 WIP
« Reply #226 on: 14 May , 2013, 12:58 »
Well done Bill !! Great bending work !

Offline Rokket

  • Administrator
  • *
  • Posts: 2,362
  • Gender: Male
  • Submarine Enthusiast
    • AMP - Accurate Model Parts
Re: U-45 WIP
« Reply #227 on: 19 May , 2013, 02:27 »
Very nice railings, looking good
AMP - Accurate Model Parts - http://amp.rokket.biz

Offline Mr. Bill

  • Commander
  • *
  • Posts: 274
Re: U-45 WIP
« Reply #228 on: 18 Jun , 2013, 21:09 »
Greetings!

A few images of the display case I just now completed for U-45.  About 20 years ago I decided to make my own display cases from clear acrylic plastic sheet.  My first attempt went well and I have made my own cases ever since.  The cost for materials and supplies is far less than purchasing a ready made case and the effort required to construct one yourself (even a large case) is not too great.  The most difficult part is cutting the acrylic sheet into the correct sizes.  I use a table saw with a fine cutting blade which works great resulting in clean cut edges.  It is important to measure everything several times prior to cutting and to also take care in making sure the cuts are straight.   Sometimes I have had the shop cut the pieces for me which saves some time.  Gluing the cut pieces requires corner clamps and careful alignment.  I use a special acrylic adhesive which bonds quickly and is extremely strong when fully cured.  Application of the adhesive is by capillary action using a small modeling brush.  The final part is to make the display base, usually from wood, but I have also used ready made laminated shelf boards with good results.  I plan to use a quality wood for U-45 and will probably look for a piece tomorrow.  Thanks for looking, your comments and questions are always welcome.

Cheers,

Bill


« Last Edit: 28 Apr , 2018, 08:33 by Mr. Bill »

Offline Rokket

  • Administrator
  • *
  • Posts: 2,362
  • Gender: Male
  • Submarine Enthusiast
    • AMP - Accurate Model Parts
Re: U-45 WIP
« Reply #229 on: 22 Jun , 2013, 01:59 »
Nice case, and thanks for the info. It always seemed scary, but sounds like you've got it down pat. Now you need a finished model to go in there... ;D
AMP - Accurate Model Parts - http://amp.rokket.biz

schemelschelm

  • Guest
Re: U-45 WIP
« Reply #230 on: 24 Jun , 2013, 12:26 »
Nice work!
I planned to build a case, too. But it seems to be difficult to cut the acrylic - till now.  :)
I'm very interested in your next steps on U-45.  :)

Offline Mr. Bill

  • Commander
  • *
  • Posts: 274
Re: U-45 WIP
« Reply #231 on: 24 Jan , 2015, 11:35 »
Greetings!

This WIP has been going on for far too many years now !!!  I really don't have any reasons for the long delay, just weak excuses!  At this point U-45 remains unfinished in a display case - I see it everyday!   As a first step, I want to update the this WIP by replacing the photos that have vanished over the years.  I will try to repost the images in the original locations of the WIP so as maintain the original flow of the build.  One benefit of this long delay is that the major repair I made to remedy the separation problem between the brass deck and styrene hull has worked well with no signs of further separation over a long period of time !

Cheers,

Bill


Offline Mr. Bill

  • Commander
  • *
  • Posts: 274
Re: U-45 WIP
« Reply #232 on: 24 Jan , 2015, 12:31 »
First batch of original photos have been restored to page 1 of WIP.

cheers,

Bill

Offline Mr. Bill

  • Commander
  • *
  • Posts: 274
Re: U-45 WIP
« Reply #233 on: 24 Jan , 2015, 16:48 »
Evil Imageshack Frog has been replaced with original photos up through page 4.  This is a tedious process, but I am determined to see it through.  Please let me know if any of the photos I am restoring to the WIP don't seem to match the text.

Cheers,

Bill
« Last Edit: 24 Jan , 2015, 16:57 by Mr. Bill »

Offline SG

  • Admiral
  • *
  • Posts: 661
    • https://3xblackcats.wordpress.com/
Re: U-45 WIP
« Reply #234 on: 25 Jan , 2015, 09:54 »
Standing-by to seeing the picture replacement completed. It's good to know you're at work again!!
« Last Edit: 25 Jan , 2015, 09:59 by SG »

Offline Mr. Bill

  • Commander
  • *
  • Posts: 274
Re: U-45 WIP
« Reply #235 on: 25 Jan , 2015, 12:25 »
If anyone happens to have copies of the photos from my post of January 18, 2010 showing the installation of the ribs in the central flooding slot I would greatly appreciated your sending them to me so I can properly update the WIP.  I looked everywhere for those particular images, but can't locate them.

Many Thanks,

Bill

uboatfan

  • Guest
Re: U-45 WIP
« Reply #236 on: 25 Jan , 2015, 13:17 »
Hello Mr. Bill,

Due to som trouble to send as PM here are the pictures....

Greatings,

Uboatfan

Offline Mr. Bill

  • Commander
  • *
  • Posts: 274
Re: U-45 WIP
« Reply #237 on: 25 Jan , 2015, 15:06 »
Many Thanks!

Those are exactly the photos I was looking for!

Offline Mr. Bill

  • Commander
  • *
  • Posts: 274
Re: U-45 WIP
« Reply #238 on: 28 Jan , 2015, 21:39 »
Greetings!

I am having trouble finding some of the old photos from my U-45 WIP.  My computer filing system and backups are in a state of chaos!  Is there a way to recover these old images from Imageshack?

Many Thanks,

Bill

uboatfan

  • Guest
Re: U-45 WIP
« Reply #239 on: 29 Jan , 2015, 10:31 »
Hello Mr. Bill,

unfortunatly there is no way i know to recover pictures from imageshack. They announced many weeks that al users have to copy to a new location. As i know they deleted everything after shut down.

Maybe i can help you...
Down to Reply #219 i have all pictures copied to my desktop. If you want i can post all here.

Regards

Uboatfan

Offline Mr. Bill

  • Commander
  • *
  • Posts: 274
Re: U-45 WIP
« Reply #240 on: 29 Jan , 2015, 10:59 »
Hello Uboatfan!

Thanks for keeping a copy of these photos!  That is really good news.  I will carefully go through my images and let you know which ones I am missing.  If you have them, you can upload them here and I will then post into the proper places.  I will let you know shortly which photos I need.

Many thanks,

Bill

Offline Mr. Bill

  • Commander
  • *
  • Posts: 274
Re: U-45 WIP
« Reply #241 on: 30 Jan , 2015, 12:42 »
Continuing the effort to restore old photos and noticed that in post #202, one of the old Imageshack photos is still visible???  Not sure why this is happening with this one image.  I am using Postimage to replace the photos from Imageshack.  Currently compiling a list of all old photos I can't locate in my files.

Cheers,

Bill

uboatfan

  • Guest
Re: U-45 WIP
« Reply #242 on: 30 Jan , 2015, 13:26 »
Hello Mr. Bill,

i have to say sorry...

Imageshack still exists. So my information was not corect!

It is no longer for free and they delete old pictures...

For more information see http://en.wikipedia.org/wiki/ImageShack

Hope you find all pictures you need. Otherwise i can post them here.

PS: Can't wait for new pictures of your great work...

Uboatfan

Offline Mr. Bill

  • Commander
  • *
  • Posts: 274
Re: U-45 WIP
« Reply #243 on: 31 Jan , 2015, 16:44 »
Hello Uboatfan,

I have gone through all of my computer files and backups seeking the missing images of the U-45 WIP, but can't locate the photos for the following posts:

174
190
193
195
196
200
201
202
213
214
215

I realize this represents a great many photos, but if you can help me get these images restored to this WIP, I would be very grateful.  Whatever method is easiest for you is fine - you can post here or send by PM or any other way you prefer.

Any help you can provide with this is greatly appreciated.

Eternal Thanks,

Mr. Bill

uboatfan

  • Guest
Re: U-45 WIP
« Reply #244 on: 01 Feb , 2015, 08:46 »
Hello Mr. Bill,

pictures from post 174

uboatfan

  • Guest
Re: U-45 WIP
« Reply #245 on: 01 Feb , 2015, 08:55 »
Post 190 and 193

uboatfan

  • Guest
Re: U-45 WIP
« Reply #246 on: 01 Feb , 2015, 08:57 »
post 195

uboatfan

  • Guest
Re: U-45 WIP
« Reply #247 on: 01 Feb , 2015, 09:00 »
post 196

uboatfan

  • Guest
Re: U-45 WIP
« Reply #248 on: 01 Feb , 2015, 09:01 »
Post 200

uboatfan

  • Guest
Re: U-45 WIP
« Reply #249 on: 01 Feb , 2015, 09:07 »
Post 201

uboatfan

  • Guest
Re: U-45 WIP
« Reply #250 on: 01 Feb , 2015, 09:09 »
Post 202

uboatfan

  • Guest
Re: U-45 WIP
« Reply #251 on: 01 Feb , 2015, 09:14 »
Post 213

uboatfan

  • Guest
Re: U-45 WIP
« Reply #252 on: 01 Feb , 2015, 09:15 »
Post 214

uboatfan

  • Guest
Re: U-45 WIP
« Reply #253 on: 01 Feb , 2015, 09:20 »
And finaly post 215

Offline Mr. Bill

  • Commander
  • *
  • Posts: 274
Re: U-45 WIP
« Reply #254 on: 01 Feb , 2015, 09:32 »
Outstanding Uboatfan!

You have helped me tremendously with these photos!

I will get them posted with the corresponding text straight away.

Look for some new photos of work I have done on the WIP - nothing major, but still progress.

Cheers,

Bill

Offline Mr. Bill

  • Commander
  • *
  • Posts: 274
Re: U-45 WIP
« Reply #255 on: 01 Feb , 2015, 16:15 »
Greetings!

All of the lost Imageshack images have now been restored!  Many thanks to Uboatfan for providing many missing photos!  Please note that there are some remaining Imageshack missing photo icons under posts from other members - I can't modify these posts so unless these members update their old posts the noxious Imageshack Evil Frog icon will remain.

If you see anything odd with these restored images, please let me know!

Cheers,

Bill

Offline Mr. Bill

  • Commander
  • *
  • Posts: 274
Re: U-45 WIP
« Reply #256 on: 01 Feb , 2015, 17:29 »
New images of my attempt to scratch build the two bow number plates for U-45.  All pre-war U-boats had these raised numbers attached to both sides of the bow.  From photographs, it appears that they had a background colour similar to the hull with darker (black?) colour for the numbers?  Any help concerning the colours would be greatly appreciated.  I made these from the AMP detail photo etch brass set for the Special Navy Type II U-Boat kit by carefully combining the parts for U-4 and U-5.  The seam is very hard to see and I think it will be invisible when painted.  I have yet to trim the corners round to better match photographs of U-45.

First photo shows U-45:


Second image is a closeup showing details of the bow number:


Final photo shows scratch built brass photo etch parts:


Thanks for having a look.  Your questions and comments are always welcome.

Cheers,

Bill
« Last Edit: 28 Apr , 2018, 08:37 by Mr. Bill »

Offline Mr. Bill

  • Commander
  • *
  • Posts: 274
Re: U-45 WIP
« Reply #257 on: 01 Feb , 2015, 17:42 »
Greetings!

Some more new images of my U-45 WIP.  These show my attempt to scratch build stanchions.  As I am modeling U-45 as she appeared on Commissioning Day, I want to include the many deck stanchions that show prominently in photographs.  At first, I considered using the metal stanchion parts from the Special Navy Type II U-boat kit, but they are a bit crude in appearance and there are not enough of them.  So, I decided to use very small 0.5mm brass tube from LionRoar, spare photo etch strips, and thin copper wire.  I first carefully cut the brass tube to the proper length for the stanchions and then made rings for the top of the stanchions by twisting small strips of spare photo etch around a sewing pin.  These rings were then glued into the top of the stanchions. Finally, I inserted thin copper wire into the bottom of the stanchions to act as a anchoring pin when they are fastened to the deck.  Once all of the stanchions are completed and fastened to the deck, I will run a silk thread through the rings.

First image shows a group of completed stanchions (I have many more to complete!)


Next image show a closeup of an individual stanchion:


Thanks for having a look.  Your questions and comments are always welcome.

Cheers,

Bill
« Last Edit: 28 Apr , 2018, 08:38 by Mr. Bill »

Offline Mr. Bill

  • Commander
  • *
  • Posts: 274
Re: U-45 WIP
« Reply #258 on: 03 Feb , 2015, 09:59 »
Greetings!

Please have a look at this enlarged photo from the book TYPE VII U-BOATS by Stern.  Apologies for the poor image quality.  As mentioned previously in the WIP, I believe this photo is of U-45.  There appears to be a row of small holes where the prop shaft housing meets the hull.  What are these?  Perhaps small flooding vents?  Note also the absence of the typical pattern of flooding vents above the prop shaft housing - which may be unique to U-45.

Many thanks for your help!

Cheers,

Bill

« Last Edit: 28 Apr , 2018, 08:39 by Mr. Bill »

Offline Bad Karma

  • Lieutenant
  • *
  • Posts: 82
Re: U-45 WIP
« Reply #259 on: 03 Feb , 2015, 12:45 »
hi,

I think they are zinc anodes.

This is a better resolution.


What i marked in red caught my eye,i have no clue what this is.

regards,

Ron

________
Let's just say I was testing the bounds of reality. I was curious to see what would happen. That's all it was: curiosity.

Jim Morrison

Offline Mr. Bill

  • Commander
  • *
  • Posts: 274
Re: U-45 WIP
« Reply #260 on: 03 Feb , 2015, 17:48 »
Hello Ron,

I believe you are correct - zinc anodes.  And what I thought were flooding holes are probably just shadows between the zincs.  Many thanks for the better resolution of this photo.  Did you get this image from the Stern book or somewhere else?  If somewhere else, does it have a caption identifying the U-boat?

Yes, what is that hole at the end of the saddle tank? ? ?

Cheers,

Bill

Offline Bad Karma

  • Lieutenant
  • *
  • Posts: 82
Re: U-45 WIP
« Reply #261 on: 04 Feb , 2015, 02:12 »
hi Bill,

The picture came from this book,page17.I have this book in ``JPG format``,i download this book somewhere from the WWW,ages ago.
The author talked about a Type VII,no possible ID for this boat.
Unfortunly this boat is belonging to my ``U-who flottila``.


And about hole in the saddle tank,i have NO idea,never seen this on a Type VII.


regards,

Ron

________
Let's just say I was testing the bounds of reality. I was curious to see what would happen. That's all it was: curiosity.

Jim Morrison

uboatfan

  • Guest
Re: U-45 WIP
« Reply #262 on: 04 Feb , 2015, 12:18 »
Hello Ron, hello Bill,

this hole at the end of the saddle tank had a very simple function:

It's a flooding hole. The basic function is still the same as at the front (look here - post 2468 to 2475:http://models.rokket.biz/index.php?topic=921.2460)

The aft section of the saddle tanks are free flooded. Look at the picture. The triangle sheet of metal is welded to the side structure. A second sheet will close this section except a very small gap to the pressure hull. So the add a foolding hole to secured that the water could get out.

Maybe only this subs was build like this. Maybe only one hole was not enough. Later build boats had three flooding holes right above the welding line.

Regards,

Uboatfan


Offline Mr. Bill

  • Commander
  • *
  • Posts: 274
Re: U-45 WIP
« Reply #263 on: 05 Feb , 2015, 09:25 »
Thanks Ron and Uboatfan for your help and information.  I found the publication (PDF file) mentioned by Ron here:

www.okretywojenne.pl/ow/download/index.php?did=47

It has some good photos, including the mysterious one that I believe is U-45.

Uboatfan - Did any other U-Boat have a flooding hole in this location?  It seems a very odd design?

Cheers,

Bill


Offline dougie47

  • Administrator
  • *
  • Posts: 758
Re: U-45 WIP
« Reply #264 on: 05 Feb , 2015, 09:44 »
Hello gents,

There is a similar hole on early VIIBs. Here is a photo of U 54 on the 15th August 1939 -


It is below the lower torpedo door. U 99 did not have this. I'm thinking that U 45 probably would have had it.

Bill - fantastic work on those bow plates. For the colour, I am not too sure but there is a good photo here -
http://www.ebay.de/itm/ORIGINAL-FOTO-WK2-U-BOOT-KRIEGSMARINE-MARINE-Quer-25-/381141594774?pt=Militaria&hash=item58bdcf3296&nma=true&si=NBSw8kOEMUOiRafPu5MGWgxBtDM%253D&orig_cvip=true&rt=nc&_trksid=p2047675.l2557
Cheers,

Dougie

Offline Mr. Bill

  • Commander
  • *
  • Posts: 274
Re: U-45 WIP
« Reply #265 on: 05 Feb , 2015, 10:16 »
Hi Dougie,

Looks like the crewman is polishing that bow number plate in that photo - maybe brass?

Cheers,

Bill

Offline Mr. Bill

  • Commander
  • *
  • Posts: 274
Re: U-45 WIP
« Reply #266 on: 05 Feb , 2015, 10:32 »
Greetings!

I noticed another unusual thing in this photo - see the blue circle.  Appears to be a "bulge" on the hull?  Any ideas of what this might be?

Cheers,

Bill

« Last Edit: 28 Apr , 2018, 08:42 by Mr. Bill »

uboatfan

  • Guest
Re: U-45 WIP
« Reply #267 on: 05 Feb , 2015, 12:17 »
Hello together,

Interesting picture about the bow plate: It is rectangular! The semicircles are just painted.

About the holes below the lower torpedo doors: Thesa are not flood holes. Early Type VII and IX had this. It is for a speedometer.

The pattern inside the blue circle: From my point of view this is a zink anode.Llook at the aft hydroplanes. There is a very similar pattern. This is a zink anode.
But if you look at the second picture (the colored one) you will find a hull opening just at same place. This should be the flooding pipe for the aft torpedo tube. So it is also possible that on U45 this was covered with a grid.

The pattern around the cover of the propeller shaft: This are not zink anodes. This are just welding lines. I attached pictures from U995 and another picture i found in the Book "Die deutschen Uboote und ihre Werften"
Last picture shows a riveted Type II cover of the propeller shaft from same Book.

@Bill: I think they made a tryout at the first Type VII B boats build. At pictures of U47 launch (29.11.38) you could see three small holes like later build boats. But later Boats had bigger holes. May be the changed the design due to first results from U45 wich launched  27.04.38 and was in service since 25.06.38. So it is possible that U45 and U47 are unique in these detail.

Regards,

Uboatfan
« Last Edit: 05 Feb , 2015, 12:29 by uboatfan »

Offline SnakeDoc

  • Admiral
  • *
  • Posts: 536
  • Gender: Male
    • Torpedo Vorhaltrechner Project
Re: U-45 WIP
« Reply #268 on: 05 Feb , 2015, 14:42 »
Hi Gentlemen,

The pattern inside the blue circle: From my point of view this is a zink anode.Llook at the aft hydroplanes. There is a very similar pattern. This is a zink anode.
But if you look at the second picture (the colored one) you will find a hull opening just at same place. This should be the flooding pipe for the aft torpedo tube. So it is also possible that on U45 this was covered with a grid.

The pattern inside the blue circle is the discharge of the cooling water system. On U45 it is covered with a grid indeed. On the other side of the boat (port), there is another hole (also covered with grid) - inlet for cooling water system, which is also connected with the aft torpedo tube flooding system (see the drawing).

--
Regards
Maciek
« Last Edit: 06 Feb , 2015, 02:24 by SnakeDoc »

Offline dougie47

  • Administrator
  • *
  • Posts: 758
Re: U-45 WIP
« Reply #269 on: 06 Feb , 2015, 13:04 »
Hello gents,

Bill - like you I think that the crewman is polishing. I did not want to say so, rather I wondered if you or others would come to the same conclusion independently. I am thinking perhaps bronze like the pre-war eagle? 

Uboatfan - thanks for telling me about the speedometer.

Maciek - very interesting on the grid for the cooling water system. I think it is also there on photos of U 47 and U 54 but not close enough to determine any detail. Perhaps you may have seen the grill on other boats. I wonder if I may ask a few questions about it -
Was the grill in the exact same location as the opening on U 995?
And was the grill square or rectangular?
Lastly, any ideas when the grill was discontinued in favour of the hole we see on U 995?

Many thanks for your help,
 
Dougie

Offline SnakeDoc

  • Admiral
  • *
  • Posts: 536
  • Gender: Male
    • Torpedo Vorhaltrechner Project
Re: U-45 WIP
« Reply #270 on: 06 Feb , 2015, 14:49 »
Hi Dougie

Maciek - very interesting on the grid for the cooling water system. I think it is also there on photos of U 47 and U 54 but not close enough to determine any detail. Perhaps you may have seen the grill on other boats.

I will look from my set of the photos.

I wonder if I may ask a few questions about it -
Was the grill in the exact same location as the opening on U 995?

Well, U 995 as the type VIIC boat was slightly longer than type VIIB. But I think that if you
would like to locate it by measuring distance from the stern, it would be the same location.

And was the grill square or rectangular?

Well, I would say the grill was circle shaped.

Lastly, any ideas when the grill was discontinued in favour of the hole we see on U 995?

What we can see on U 995 is not original state. On stb side we can see the hole, port side hole
is blanked. I think, that when U 995 was in service, the holes were covered by grills.

--
Regards
Maciek

Offline dougie47

  • Administrator
  • *
  • Posts: 758
Re: U-45 WIP
« Reply #271 on: 07 Feb , 2015, 06:25 »
Thanks Maciek,
 
Much obliged to you.
 
Cheers,
 
Dougie

Offline Mr. Bill

  • Commander
  • *
  • Posts: 274
Re: U-45 WIP
« Reply #272 on: 28 Apr , 2018, 08:54 »
Greetings!

All of the links for the images I posted on this topic have now been edited and are working properly.

For some reason postimage.org was recently blocked for a domain definition problem and had to change to postimag.cc

The result is all images hosted by the old URL will not resolve properly.  I had to go through every image link, one by one, and edit ".org" to ".cc"

If anyone notices any images that I may have missed on this topic, please let me know.  I will have to eventually go through all of my other forum posts and edit those image links also.

Many Thanks,

Bill

Offline 70skid

  • Midshipman Cadet
  • *
  • Posts: 7
  • Gender: Male
Re: U-45 WIP
« Reply #273 on: 04 May , 2018, 14:58 »
Outstanding work!!

Offline Mr. Bill

  • Commander
  • *
  • Posts: 274
Re: U-45 WIP
« Reply #274 on: 23 Jun , 2018, 12:35 »
Thanks !

Offline Mr. Bill

  • Commander
  • *
  • Posts: 274
Re: U-45 WIP - Completion Photos October 2019
« Reply #275 on: 11 Oct , 2019, 21:56 »
Greetings!
Goodness! - Time flies like an arrow; fruit flies like a banana . . . .

Cheers,
Bill


« Last Edit: 11 Oct , 2019, 22:20 by Mr. Bill »

Offline Mr. Bill

  • Commander
  • *
  • Posts: 274
Re: U-45 WIP - Completed October 2019
« Reply #276 on: 11 Oct , 2019, 22:41 »
More completion images . . .


Questions and comments always welcome!

Offline dougie47

  • Administrator
  • *
  • Posts: 758
Re: U-45 WIP - Completed October 2019
« Reply #277 on: 12 Oct , 2019, 06:07 »
Hello Bill,
I knew you were going to do a good job but the finished model is way beyond the norm. It is easily - by a big distance - my favourite U-boat model. This is in respect to three aspects.

Firstly the subject choice and date depicted. The VIIBs with the early tower have simple uncluttered lines with more aesthetic appeal than even the VIICs. When this is allied to the pre-war numbers and red-white buoys it makes the subject choice even better looking.
The second aspect is research and attention to detail. Getting the attack periscope housing correct was a big clue that this would be a brilliant build. Adding text to the buoys and adding extra wires on the rear port jumping wire are also very pleasing. But for me it is the cover on the KDB on the foredeck, which I have never seen depicted on any model. And then there is the lid on the sky periscope and the fact you have the UZO head in a lighter grey.

Thirdly is the modelling standard which is also excellent.
Finally someone has done a pre-war VIIB to perfection.
Cheers,
Dougie

Offline Mr. Bill

  • Commander
  • *
  • Posts: 274
Re: U-45 WIP - Completed October 2019
« Reply #278 on: 12 Oct , 2019, 20:33 »
Thanks Dougie for the kind words!  I received a great deal of help and inspiration from everyone here on AMP.  In particular, you provided a wealth of information on these early VIIB boats which helped tremendously.   I have always liked the look of the pre-war VIIB boats and got to thinking about a large scale build when the Amati kit came out in the 1990's.  The more I looked at photos and gathered information on the pre-war boats, I just knew I had to build one.  Well, one thing lead to another and U-45 has finally been completed.   

Thanks again,Bill

Offline SG

  • Admiral
  • *
  • Posts: 661
    • https://3xblackcats.wordpress.com/
Re: U-45 WIP - Completed October 2019
« Reply #279 on: 28 Oct , 2019, 12:26 »
Bill this is great news! I am really happy that you managed to complete the project, after so many years and difficulties! It looks marvellous and most inspiring. As a big fan of the VIIB's I rejoyce.
GREAT GREAT GREAT WORK, congratulation!!
 

Offline GlennCauley

  • Admiral
  • *
  • Posts: 646
    • Models by Glenn Cauley
Re: U-45 WIP - Completed October 2019
« Reply #280 on: 01 Nov , 2019, 12:15 »
This is beautiful.  :)
Glenn Cauley
President, IPMS Ottawa
gc-scalemodels.ca

Offline Mr. Bill

  • Commander
  • *
  • Posts: 274
Re: U-45 WIP - Completed October 2019
« Reply #281 on: 12 Aug , 2021, 09:53 »
Many thanks to everyone for the comments!  who will be lucky visit number 88,888?
Bill

Offline Mr. Bill

  • Commander
  • *
  • Posts: 274
Re: U-45 WIP - Completed October 2019
« Reply #282 on: 24 Dec , 2022, 07:51 »
With the coming closure of the forum, I wanted to thank everyone that provided comments and assisted me with this build and others on the site.  Many thanks and best wishes in your future endeavors!
Bill